Client Guide : Using Xinet Portal : Create an Advanced Search Query

Create an Advanced Search Query
To create advanced search queries, using logical operants and constraints, use the Advanced Search function located at the bottom left corner of the Portal display.
Note: This search type is available for both Solr Search and the FullText search.
In this Section:
Advanced Search, At a Glance
For more detailed steps, see the next section.
Advanced Search, Xinet Portal Marquee Theme:
Advanced Search, Xinet Portal Exhibit Theme:
Advanced Search Steps (Marquee Theme)
Limit an Advanced Search to Selected Folders or Volumes (Marquee Only
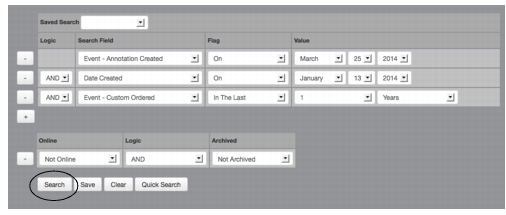
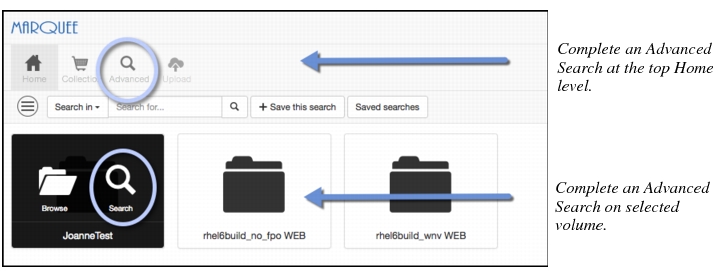
Marquee theme users can limit their advanced search to particular volumes depending on where they access advanced search (see the illustration below):
All Mounted Volumes: Selecting the Advanced Search icon on the Home level of the browser interface to search for assets on all mounted volumes.
Selected Folders: Selecting individual folders in the navigator and then clicking the Advanced search icon on the Home level of the browser interface to conduct a search in specified folders.
Selected Volumes: Selecting a volume in the Home browser view and then click the Advanced Search icon on a specific volume to locate assets in the selected volume.
Types of Advanced Searches, Marquee Theme:
To do an advanced search from the Marquee theme:
1.
Click Advanced on the top of the browser view to conduct a global advanced search on all mounted volumes.
2.
Optional - Click on one of the mounted volumes listed in the browser view and then click Search to conduct an advanced search in the selected volume.
Optional - Click Advanced, open the navigator, expand a volume, and select a folder or folders to search in, then click Advanced.
3.
On the Search Field menu, select the logic operator.
4.
Under the Flag field, select a logical constraint.
For more information on the logical constraints available, see Constrain Advanced Searches.
5.
In the Value menu box, type a value to query.
6.
Click the plus icon to add more logic to your query.
7.
Optional - Click Save to save your search query to use at a later time.
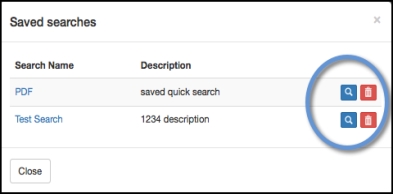
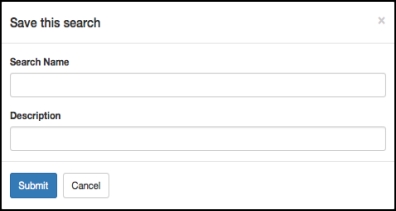
For more information about saving searches, see Save a Search Query.
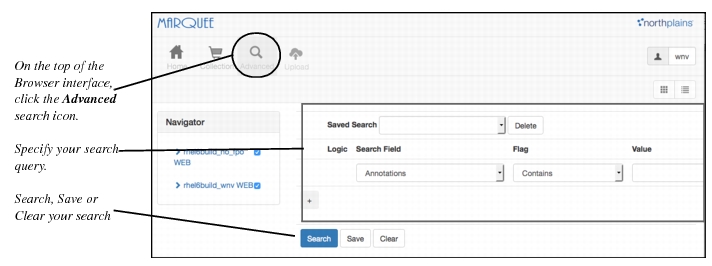
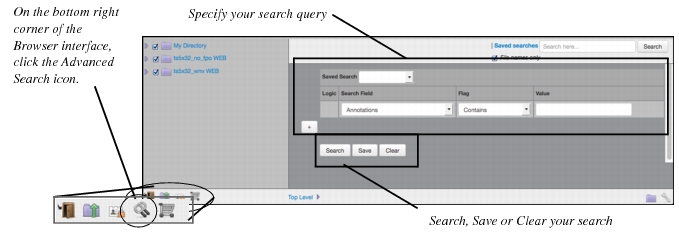
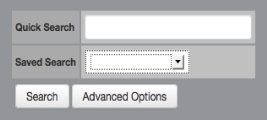
8.
Click Search.
Advanced Search Steps (Exhibit Theme)
To do an advanced search from the Exhibit theme:
1.
2.
Click Advanced Options.
3.
Under the Search Field, click the drop down menu, and select a data field option.
4.
Under the Flag field, select a logical constraint.
For more information on the logical constraints available, see Constrain Advanced Searches.
5.
Under the Value field, type the value you are searching for.
6.
7.
Under Logic field, click the drop down menu, and select a logical operand.
For more information about available operands, see Logical Operands.
8.
Tip:
9.
Click Search to review your results.
Save a Search Query
You can create several search queries and store them for later use. Saved search queries are shared with all users using the same Portal server.
Note: If you do not see saved searches created by other users using the same Portal server, contact your Administrator; you may need permission to view them. (Note to Administrators: The Site Manager > Edit Site > Configuration option, Allow sharing of saved search between users sharing primary server, must be enabled.)
In this section:
To save a search query
For Marquee:
1.
The Save Search dialog box is displayed.
2.
In the Search Name field, type the name of the search.
3.
Optional - In the Description field, type a description of the search.
4.
Click Submit.
For Exhibit:
1.
2.
In the Save As field, type the name of your search.
3.
In the Description field, type a description.
4.
Click Save and Search.
To reuse a saved search query
Saved Advanced Search queries are available to all users in the same user group, using the same Portal site. You can access saved search queries in Quick Search and Advanced Search interface. Note that Quick Search and Advanced search do not share saved search queries.
For Marquee:
1.
A list of saved searches is displayed in a dialog box (or, for Exhibit, a pull-down list).
2.
For Exhibit, select a query and click Search to review the query results
3.
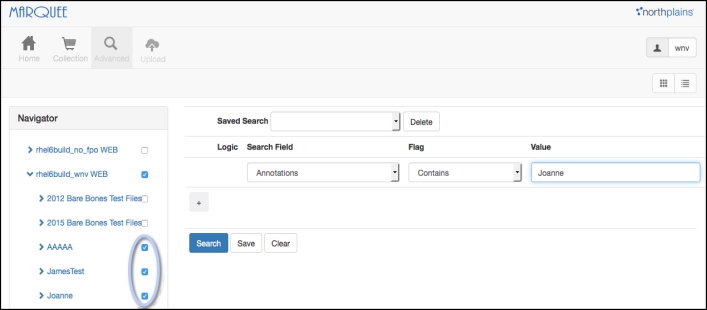
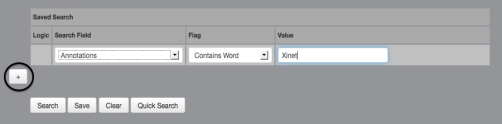
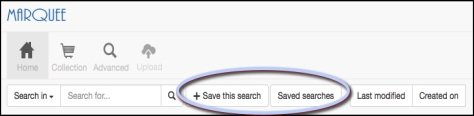
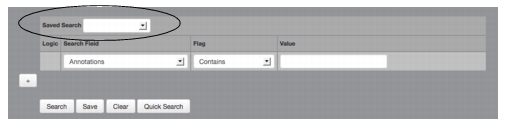
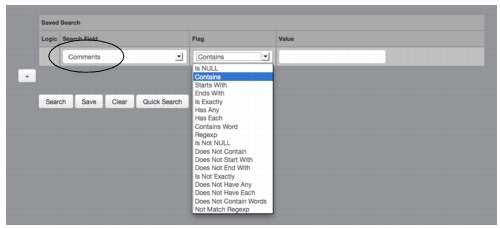
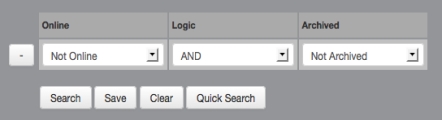
Saved searches, Marquee:
4.
For Exhibit:
1.
2.
.
3.
The selected query is displayed in the Advanced Search interface. The following is an example:
4.
Click Search to see the latest search results for the query.
To edit an advanced saved search (Exhibit only):
1.
2.
3.
Click Save.
4.
5.
Optional: Type a description.
To delete a saved search query:
Saved search queries are common to all users using the same Portal server. You can delete your unwanted saved search queries. You cannot delete search queries created by other Portal users.
For Marquee:
1.
A list of saved searches is displayed in a dialog box.
2.
Click the Delete icon to remove a selected saved search query.
For Exhibit:
1.
On the Advanced Search view, in the Saved Search field, select a saved search from the list.
2.
Click the Delete button.
Constrain Advanced Searches
You can construct simple or more complex searches using logical constraints. Depending on the Search Field selected in the Advanced Search drop down menu, logical constraints will vary. The following is an example of the constraints for the search field Comment.
For example, if you were to conduct a Has Any search on the string, blue yellow green brown fox, the search engine would search for any of these five tokens. However, if you were to conduct the Has Any search on the string blue yellow green “brown fox”, the search engine would consider the sequence “brown fox” as a single token, with the space included and search for four tokens.
Works using the same token concept as Has Any, except every token in the search query must be present for a file to be included in the search results.
Appears when users conduct Search All Indexed Fields queries and works using the same token concept as Has Any. While each token within the query has to be found before a file or folder will be included in the search results, the tokens do not have to be in the same field. Some may be found, for example, in the filename; others in various Data Fields or in the content of text within files. The query will return search results as long as the tokens are all found in the entire set of fields through which the user has permission to search.
Returns matches when the search token matches a full word. For example, if the Contains Word search were for the string test, the query would find the files this is a test.jpg and another test file.pdf, but wouldn’t find testing.tif nor tester.gif. A normal Contains search with the string test would find all four of these files.
Allows users to enter a Regular Expression, as defined at http://dev.mysql.com/doc/refman/5.1/en/regexp.html.
Returns matches that are NULL (where data has not been entered). Only possible without a FullText Index, and not applicable to some fields. For example, it doesn’t make sense to have a Filename with nothing in it, nor to Search All for nothing.
Returns matches whenever all of its operands are true. Also known as the logical conjunction.
Returns matches whenever one or more of its operands are true. Also know as the logical disjunction or inclusive disjunction.
The exclusive OR (XOR), also known as the exclusive disjunction logic operand, probably won't get used much. It translates simply as “one or the other, but not both.”
NOT serves as an operand modifier. The Not modifier can also be used in conjunction with Is NULL to search for fields that have any value at all, i.e., is NOT NULL.
Tip:
NOT provides a powerful Search constraint
Some Searches allow for NOT to be specified, for example, allowing you to find all images in a group that are not CYMK TIFFS or all assets that have not be marked Approved. Using the NOT with an IS NULL value in a Search can be especially powerful, allowing a user, for example, to recover all values that have been previously applied to a particular keyword. A Search can also use NOT to turn a greater-than Search into an equal-or-lesser-than search.
Logical Operands
Very complex searches are possible when one search is strung to another using the logical operands AND, OR, and XOR. In such cases ORs and XORs are always evaluated after ANDs. Here are a few examples:
Search 1: A and B or C
(This is possible in a single search because ANDs are always processed before ORs.)
Search 1: B or C
Search 2: A and Search 1
Search 1: A or B
Search 2: C or D
Search 3: Search 1 and Search 2
Search 1: A and B or C and D
Search 2: E or F
Search 3: Search 1 or Search 2 and G
Searching for Deleted Items when Collecting Information for Reports
While most users don’t want searches to return deleted items, there are times when this can be useful, such as when compiling reports. It is possible to retrieve this information from the database, searching for assets that are neither archived nor online.
To create a search query to include deleted items:
1.
The Online options are displayed.
2.
Set the Online option to Not Online, Logic to AND, and Archived to Not Archived.
3.
Click Search to see the search results.