The compare Action is used to determine if the
Action selected in a
Trigger Set should be executed or not. Any writable Xinet metadata fields will be available for selection in the
compare New Setting screen’s Argument list. After naming a
Setting, optionally, choosing a
Setting Set, and typing a description, select an appropriate
Data Field from the
Arguments pop-up list (the list varies according to the Data Fields already established on your system) and configure it by selecting a value from the pop-up list to its right. The figure below shows those options for a
Date Data Field:
If you are working with Boolean fields, for instance, you might make a
compare setting in which the
Boolean Yes/No field is set to
Yes. Later, in the
Trigger Set, you could then specify the
compare setting to be used as a test to determine if a rule that follows it will be run or not.
For example, if a date trigger is used to archive a file, you may wish to first check the value of a boolean metadata field. In this example, the rule will only be executed if the Boolean Yes/No field is set to
Yes. If the test succeeds, then the archive can proceed; if the test fails, then the archive
Action will not be run. In this way,
compare is used with date triggers to make decisions based on existing metadata values.
The copy Action copies the file/directory to the location specified in the
Destination field of the setting. Both absolute and relative paths may be used to specify destinations, but the destination directory must already exist for the
Action to succeed. If the
copy Action attempts to copy a file or directory to a location that does not exist, it will exit as
failed and the failure case in the
Trigger Set (
Continue, Exit, Exit and Notify) will apply.
You may also use custom keyword values in the copy Action Destination path. To do so, choose
Path from the
Destination pop-up list rather than
Browse, so you can enter the path. Then enter the correct path in the field, appending
$KEYWORD###_VALUE at the end of the path, where
XXX is the
Data Field’s keyword value. If you do not know the value, the easiest way to look it up is to check the
Database, Data Fields, Summary page. The
ID column displays the number for each
Data Field.
on a system where the Customer Data Field had been established with an
ID=137.
If, in this example, $KEYWORD137_VALUE = Acme, then the file would be copied into
/Volumes/Production/Customers/Acme.
The Overwrite/Append/Fail option determines what the behavior will be if there is already a file or directory in the location with the same name as the file the
Action is attempting to copy. In the case of
Overwrite, the
Action will automatically remove a file with the same name that exists in the destination location before copying the file/directory. If a directory with the same name already exists in the destination, the
Overwrite option will not delete it automatically as a safety precaution. In this case, the same behavior as in
Append will occur. In the case of
Append, the
Action will automatically rename the file, adding a unique sequential number when it copies the file. If a
myfile.tif already exists in the destination, the
Action will make a copy of the file named
myfile.tif.1 in the destination when
Append is selected. If
Fail is selected, the
Action will fail and the failure case in the
Trigger Set (
Continue, Exit, Exit and Notify) will apply.
The email Action provides more opportunity for customizing than any other
Action shipped with Xinet. Each entry in an
email Action Setting is a string that may include tagged names of Environment Variables to swap in..
The inherit_parent_metadata Action can automatically add metadata from a parent folder for events within an
Active Path. For example, if you assigned a
Job Number metadata field on a folder the value of
333, every file moved into that folder could automatically have the same
Job Number assigned to it. It is possible for any event to trigger such an
Action. Even a
Delete event might be useful in some situations, as the file record for a deleted file remains in the database and its metadata values could still be inherited and used in, for example, a following
e-mail Action as notification.
When triggered, the inherit_parent_metadata Action looks at all the parent folders for a file and applies the value (if one is found) for each specified keyword found in the lowest-parent folder. If it is a folder containing files that is in question, the metadata will be applied, as appropriate, to both the folder and the files within it. If more than one parent folder has a value for a specific keyword, only the value of the lowest-parent folder will be applied. If none of the parents have a value for a keyword and the
Clear existing value before inheriting option has been set to
Yes, the value of that keyword will change to
Null; otherwise, the keyword in the file retains its current value. Where a top-level folder sets a value and a lower sub-folder sets another value, the lower sub-folder should take precedence.
As of Version 17.0 of the Xinet, FileIDs for all folders are maintained in the Path table in order to reduce the overhead of finding FileIDs for parent folders. Nevertheless, just like any other
Action, when applied to an entire volume (where it could be triggered for every file put on the system), the
inherit_parent_metadata Action could result in a heavy system load; and since this particular
Action is executed within the Xinet database, you may want to be mindful of how the load affects other system operations when initiating the
Action.
|
1.
|
On the New Setting page, select inherit_parent_metatdata from the Action pop-up list.. 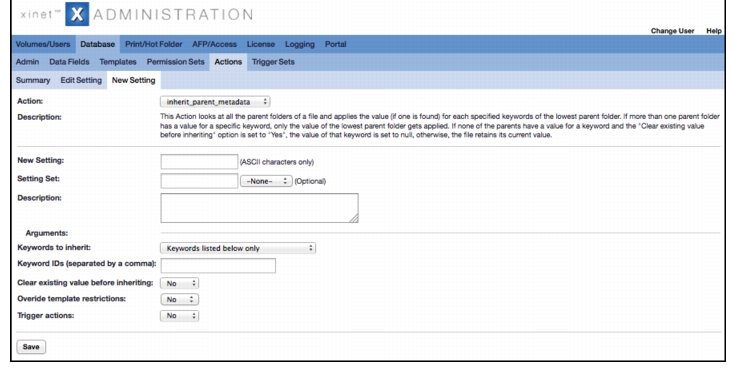
|
|
2.
|
Fill in the New Setting name for the Action, optionally, choose a Setting Set and then add a Description for the Action.
|
|
3.
|
Use the Keywords to inherit pop-up list to establish the range of keywords that will be effected by the i nherit_parent_metadata Action. Choices include:
|
• All keywords that the user can modify
(This option limits the
Action to those keywords for which the user who triggers the
Action has permission to alter. You do not need to list them specifically.)
|
4.
|
If you have selected the option, Keywords listed below only, or the option, Both, add the necessary Keyword IDs to the Keyword IDs (separated by a comma) field. You can find the IDs on the Database, Data Fields, Summary page, in the first column. For example, you might have an entry such as 123, 124, 125.
|
|
7.
|
Use the Trigger Actions pop-up list to determine whether you would like your inherit_parent_metadata Action to trigger other Actions. Normally, an Action that changes a metadata value cannot trigger another Action. This is to prevent circular situations where triggers run in an infinite loop. Setting this option to Yes allows the Action to override that safeguard, but great care should be given to make sure that no infinite trigger loops are created.
|
The label Action changes the color of Os
Finder labels to a color specified in the
Xinet Administration view whenever the
Action is triggered.
|
1.
|
Open the Database/Actions/New Settings page and select label from the Action pop-up menu.. 
|
|
2.
|
Fill in a New Setting name, optionally assign a Setting Set, and supply a Description.
|
The makeversion Action allows you to configure the Xinet server to automatically save versions of files rather than writing over the original. It creates a version whenever it is triggered. You may configure it so that it creates versions based on when a file has a particular filename suffix, is of a particular file type, or has a particular string in its filename. You can also specify the number of versions to keep and configure
makeversion to take into account the length of time that has elapsed since the last version was saved by the same user.
The move Action moves the file/directory to the location specified in the
Destination field of the setting. Both absolute and relative paths may be used to specify destinations, but the destination directory must already exist for the
Action to succeed. If the
move Action attempts to move a file or directory to a location that does not exist, it will exit as
failed and the failure case in the
Trigger Set (
Continue, Exit, Exit and Notify) will apply.
You may also use custom keyword values in the move Action Destination path. To do so, choose
Path from the
Destination pop-up list rather than
Browse, so you can enter the path. Then enter the correct path in the field, appending
$KEYWORD###_VALUE at the end of the path, where
XXX is the
Data Field’s keyword value. If you do not know the value, the easiest way to look it up is to check the
Database, Data Fields, Summary page. The
ID column displays the number for each
Data Field.
on a system where a Customer Data Field had been established with an
ID=137.
If, in this example, $KEYWORD137_VALUE = Acme, then the file would be moved into
/Volumes/Production/Customers/Acme.
The Overwrite/Append/Fail option determines what the behavior will be if there is already a file or directory in the location with the same name as the file the
Action is attempting to move. In the case of
Overwrite, the
Action will automatically remove a file with the same name that exists in the destination location before moving the file/directory. If a directory with the same name already exists in the destination, the
Overwrite option will not delete it automatically as a safety precaution. In this case, the same behavior as in
Append will occur. In the case of
Append, the
Action will automatically rename the file to add a unique sequential number when it moves the file. If a
myfile.tif already exists in the destination, the
Action will rename the moved file
myfile.tif.1 in the destination when
Append is selected. If
Fail is selected, the
Action will fail and the failure case in the
Trigger Set (
Continue, Exit, Exit and Notify) will apply.
This movetree action shuttles files and directories between one path in the file system and another, maintaining any underlying directory structure throughout operations. This is useful for archive-to-disk implementations where you want to move a set of data from a live production area to an “archive” area, then sometime later, copy it back.
The pdfconvert Action, when triggered, runs the
/usr/etc/appletalk/pdfopi binary (
C:\Program Files\Xinet\FullPress\pdfopfor examplexe on Windows) using settings established in the GUI regarding resolution, colorspace, etc., to produce an output PDF in a given,
Target directory. The
Action will replace images within PDF files (including PDF-native Illustrator documents) at a specified resolution as well as color-convert them should that be desired. No Hot Folder or a special PDF IR print queue is required.
If the Create a version of original file option is turned
on, the
Target directory setting will be ignored and the output PDF will replace the input PDF. The input PDF. The input PDF, for example., the original PDF, automatically becomes a version of the new, converted PDF, which Xinet will save in the
current_working_folder/Versions directory, appending a
-001 suffix to the file name. With appropriate
Show Versions permission on the
Volume, users can use the Xinet Versioning control tool to retrieve the original file. (This versioning mechanism makes silent use of an additional, “custom”
Action.
The pdfconvert Action may be useful, for example, if one were charged with uniformly presenting various PDFs on a Web site for downloading. The original PDFs might come from many different sources, some produced by Microsoft Word, some from Adobe products—and arrive as larger files prepared for print production. The department in charge of the Web site might not have access to the original images and have to rely on what has been embedded in the arriving PDFs. The
pdfconvert Action would normalize all these incoming files, making sure that they had appropriate image-resolution and color settings for reliable downloading. And, of course, if one were to use the
Action’s built-in versioning mechanism, the PDF in its original form could always be retrieved.
|
1.
|
Open the Database, Actions, New Settings page and select pdfconvert from the Action: pop-up list. 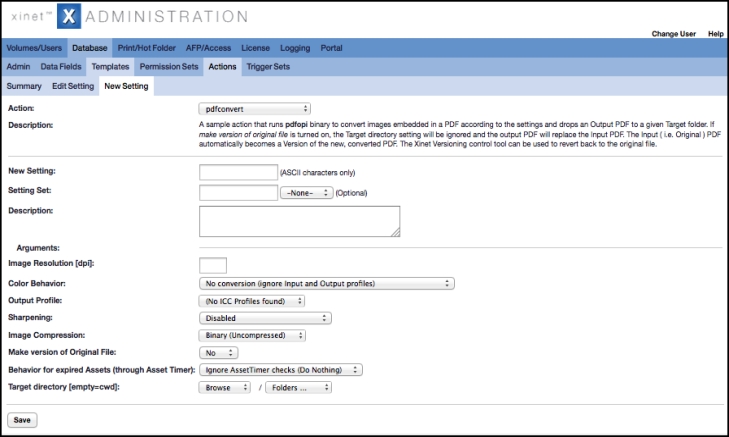 .
|
|
2.
|
Supply a New Setting name (ASCII characters only) and if you’re using Setting Sets on your system, use the Setting Set pop-up list to include the new Action in one of them.
|
|
4.
|
Fill in the Arguments fields that determine the behavior for the pdfopi binary as it replaces images in the PDF and establish whether or not the binary should create versions of the original file in its current directory or use a different directory for the new PDF it creates.
|
|
a.
|
Supply the Image Resolution field with a value in DPI.
|
Keep embedded profiles (in which case, the current
Input Profile will remain embedded in the new file without any transformation taking place when it’s created)
|
c.
|
[optional] If you selected Use embedded profiles for conversion in the previous step, you must supply an Output Profile. Use the Output Profile pop-up list. If you do not see the profile you want in the Output Profile pop-up list, turn to Step 5. to find information about adding your own profiles.
|
|
d.
|
Use the Sharpening pop-up list to establish whether the pdfopi binary will use Xinet Sharpening options during image replacement. Options include:
|
|
f.
|
Use the Make version of Original file pop-up list to establish where the new file will be written. If you select Yes, the pdfopi binary will save a version of the original file in the current location and give the transformed file the original name, also in the current directory. If you select No, you must establish a Target directory, where the pdfopi binary will write the transformed file.
|
|
h.
|
[optional] If you selected Yes in Step f., leave the pop-up selections for Target directory so that they read Browse and Folders.... or Path /.The pdfopi binary will use the Current Working Directory.
|
PDF Image Replacement workflows provides more information about Xinet and PDF IR.
The print Action submits the file/directory to the selected print queue. (The GUI will provide a pop-up list of all existing print queues on the system from which you can make a selection.) If the file is “unprintable,” such as a directory, the
Action will still tell the
Trigger Rule it was a success because it was able to make the delivery to the queue. If the
Action tries to print to a queue that no longer exists—perhaps it was deleted from the server after the settings were saved—then the
Action will return an error.
The print Action successfully handles
PDFs, most image types, and of course PostScript files.
The remove Action removes the file from the file system. If the
remove Action is executed relative to a directory, then it will exit with an error. The
remove Action will not automatically remove directories as a safety precaution.
The setdatafield Action, when triggered, changes the value of a
Data Field. For details, see
The setdatafield Action.
The transfer Action is used to transfer files to remote servers over
FTP,
HTTP or SCP using the
curl(1)
binary included with Xinet. To learn more about using
cURL (
Client for URLs), look at its man page and visit the Web site at
http://curl.haxx.se/.
Before configuring the transfer Action, be sure that you are able to successfully transfer files using
curl(1)
on the command-line. This will help you work out any potential problems with file transfer, such as
FTP Host name (or
IP address) or password problems, before adding automation. Also, be aware that when using
curl(1) to transfer files, it uses relative paths to access the upload directory. If you usually enter:
when using an FTP client to transfer files to/from a site, you will need to take note of the relative path you would use to get to
/public, such as:
Using curl(1) for transfer also allows you to use either
HTTP,
FTP or SCP to transfer files; but, please remember:
if you cannot get the transfer to work from the command-line, it will not work when you add it to a Trigger Set.