Administration Guide : Xinet Statistics and Database Operations — the Database, Admin subtab : Backing up and restoring data

Backing up and restoring data
Scheduling backups
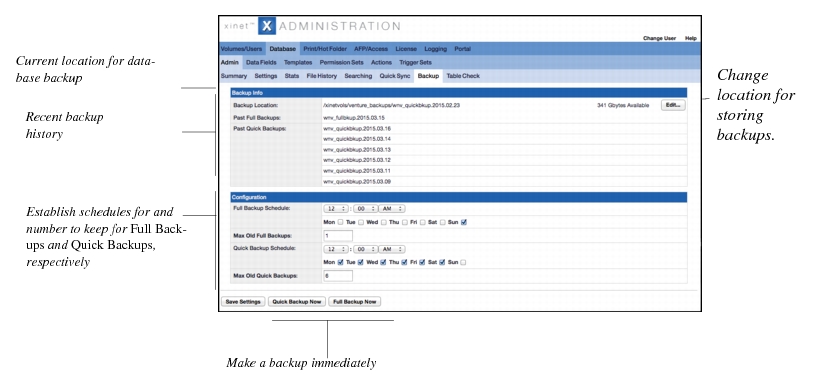
The Backup subpanel allows you to look at and establish parameters about how Xinet backs up data stored in its database.
Xinet, like other SQL databases, stores information in tables. During database backups, each table is put into read-only mode as it is backed up. Most tables are small and won’t be read-only for long. However, larger tables can be read-only for some time, and for this reason, it is best to schedule backups for times when system activity will be low.
Any errors encountered in backing up the database will be recorded in /var/adm/appletalk/venture.log on Unix systems and C:\Program Files\Xinet\FullPress\venture.log on Windows systems. You can also conveniently view this information under the Logging tab.
Important: Schedule your Solr Database purge process to remove unwanted index entries of deleted files before scheduling a backup or periodic sync and table checks to avoid CPU performance issues. For more information, see Setting your own Schedule to Purge Deleted Files From your Solr Database.
To establish the location for Backup storage:
1.
Next to Backup Location, click the Edit button. You’ll see a dialog box where you can redirect restorations.
2.
Use the click-sensitive New Backup Directory path and the Folders pop-up menu iteratively to provide the folder name where you want to have the backups stored. Employ the New Folder option if you want the backup to go to a directory that doesn’t currently exist. Also note that the directories in the path shown to the left of the pop-up are links. You can use them to move around the file system more quickly. Click the Save button afterwards. When you do, Xinet will create the directory on the server if it does not already exist.
When you choose the location, keep in mind that a single Full Backup will be as large as the database itself. It’s a good idea to chose a location that, itself, will be backed up to storage media frequently.
To set up a backup schedule:
1.
Click on the Database, Admin, Backup subtab.
2.
Using the pop-up lists and check boxes, establish schedules for making backups. There are two varieties of back-ups: Full Backups and Quick Backups. A Full Backup will contain everything that’s stored in the database including all previews. A Quick Backup will contain everything, except previews.
You probably want to schedule Quick Backups more frequently than Full Backups. A Quick Backup might be used to fix a problem with a single table, e.g., the File Table. If, however, there were a general failure or corruption, you would restore a Full Backup.The backup directories, once written to the backup location, will be named following these conventions:
wnv_fullbkup.yyyy.mm.dd
wnv_quickbkup.yyyy.mm.dd
The database has also been scheduled to periodically check for table corruption, as described in Scheduling Table Checks. There is a lock to prevent verification and backup from occurring at the same time. Xinet will resolve scheduling conflicts should they occur.
Tip:
3.
Type a number in the Max Old Full Backups box to establish the maximum number of Full backups you want to store in the backup location at a given time. You may store up to 100.
Also establish the number of Quick Backups you want to keep concurrently. Once again, you may keep up to 100.
To register these changes (and possibly, depending on the number of backup copies that are already stored, to clean out your backup directory), click the Save Settings button at the bottom of the GUI.
4.
[optional] If you want to backup your system immediately, or override the established backup schedule, use the Quick Backup Now or Full Backup Now buttons at the bottom of the GUI.
Restoring backups
To restore database backups, you need to work from the command-line with root (Unix) or Administrator (Windows) privileges. With each backup, Xinet includes a script within the backup directory intended to automate the restoration process. The script will be called either RESTORE_QUICK or RESTORE_FULL on Unix systems and RESTORE_QUICK.bat or RESTORE_FULL.bat on Windows systems, depending on whether the directory contains a Full or a Quick Backup. Here’s how to use the scripts:
1.
Run the restoration script, either RESTORE_FULL or RESTORE_QUICK:
Unix:
# RESTORE_FULL
or
# RESTORE_QUICK
Windows:
# RESTORE_FULL.bat
or
# RESTORE_QUICK.bat
The script will run, prompting for several responses to which you should answer affirmatively:
Xinet Webnative Venture Backup Restore...
Warning! This script will temporarily stop the mysql daemon and restore the back up found in this directory overwriting the existing database!
Are you sure you want to continue? [y/n]
y
Attempting to shutdown mysqld...
Shutdown succeeded!
Copying fulltext indexed file table...
Copy done!
Restarting mysqld...
Restarted!
2.
Running mysql client as user root to run fullrestore.sql...
Enter password:
Afterwards, it will complete the restoration process. The time it takes to restore the backed-up database will vary, depending on the size of each table in the backup you’re restoring. When the process is complete, you’ll see:
Restore Script Completed
Indexes, if necessary, will be created and any webdblogs that have accumulated while the daemon was off will be processed.