Before setting up key frame detection you must first enable Video Frames on each volume where you would like to store video and interactive files:
|
1.
|
Open the Volume/Users, System Volumes, Summary page. The presence of the Video Frames column in the Summary indicates that the Video module has been installed. 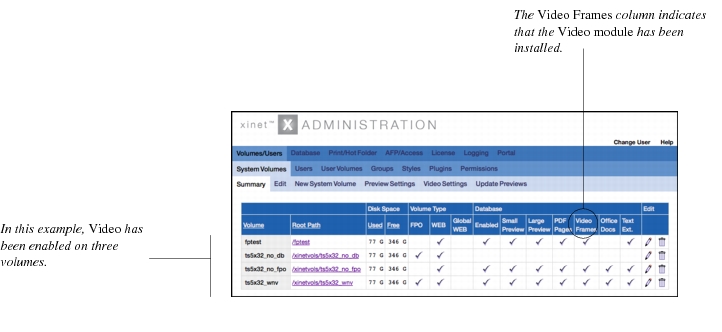
|
|
2.
|
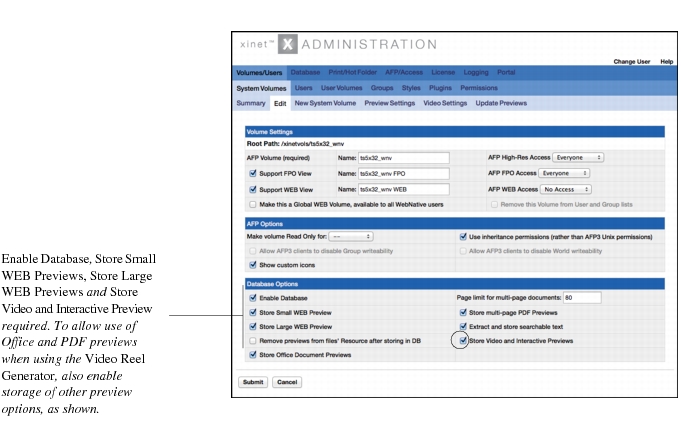
You must turn on Enable Database, Store Small WEB Preview, Store Large WEB Preview, and Store Video and Interactive Previews for each volume where you’ll be using Video. If you want users to be able to include Office previews and PDFs when using the Video Reel Generator, you should also enable other preview options within the database.
|
To do so, either click the Edit Setting icon (the pencil) associated with an individual volume in the
Summary or use the
Volume/Users, System Volumes, Edit tab and select the volume in the
Select a Volume pop-up window.
|
3.
|
After clicking the Submit button, you’ll be ready to go on to Video Settings configuration, as described in the next section. Submission may take some time, as syncvoltodb(8) must update the contents of the database.
|
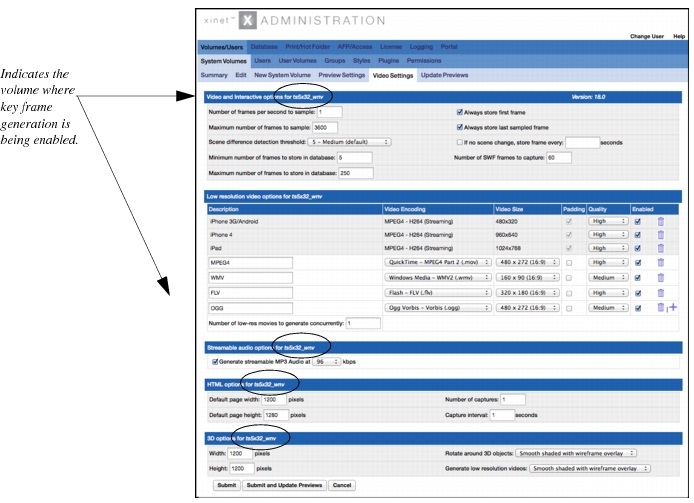
The Volumes/Users, System Volumes, Video Settings page provides options that allow you to establish how the Xinet server will process video and interactive files for storage in the database.
|
2.
|
In the Video and Interactive options section, enter a number between 1 and 8 in the Number of frames per second to sample field. (The default setting is 1.) The higher the value, the more processing/ CPU it will take to process a video. Depending upon video content, scene changes may be detected more accurately by specifying a higher frame/second value. As a guideline, a value of 1 or 2 should produce good results.
|
|
3.
|
Enter a number between 100 and 50000 (no commas or points) in the Maximum number of frames to sample field. (The default setting is 3600 frames, which would provide 1 hour at 1 frame/second.) To ensure that you generate frames for an entire video, use the following formula:
|
|
4.
|
Use the pop-up list to establish the Scene difference detection threshold. (The default number is 5.) This heuristic value is used to determine how much two images must differ in order to be considered a scene change. Lower this value to increase the number of frames detected; increase it to decrease the number of frames detected. A setting of 9 produces the fewest frames, while 1, the most.
|
Scene detection occurs by comparing frames. A frame comparison results in a scene difference value, the higher the value the more change there is between the two frames. The
scene detection threshold allows you to adjust up or down the value to be used when determining if there is enough difference between two frames to be considered a scene change. Hence, a value of
9 –
High (fewest frames) raises the threshold value, telling the Xinet Video Engine that there must be a lot of change between the two frames to be considered a new scene. A value of
1 –
Low (most frames) lowers this threshold value and tells the Video Engine that less of a change establishes a new scene.
Scene detection will discard all frames that it considers to be blank or duplicates, which means that occasionally, a user may not see the exact, anticipated number of frames. The Video module’s
movsync(1M) process considers a frame to be blank or a duplicate when 90% of its colors fall within a 10% range. (With a 90% setting, it filters out completely blank frames as well a leading title frames and cast frames at the end.)
A value of Off turns
off scene detection altogether. In this case you must engage the
If no scene change option and specify a value. (See
page 386 for more information.)
|
5.
|
Enter a number between 2 and 1000 (no commas or points) in the Minimum number of frames to store in the database field. This number will be used, when applicable and allowed by scene detection. Note, that there is also a Maximum number of frames to store in the database field and its number must be larger than the number entered in the Minimum number field. The Maximum number of frames to store in database setting establishes the upper limit for the number of frames that the movsync(1M) program stores in the database per video. You can type in any number between 2 and 10000 (no commas or points). The default is 250.
|
• Always store last sampled frame
The default is
true, which ensures that the last
sampled frame of a video will always be used. Note if your video is 1-hour long and you choose to only sample 1800 frames at 1 frame/sec, then the last sample frame will be at the 30-minute interval. This will be the last frame stored.
• If no scene change, store frame every xyz seconds
The default is unchecked (disabled). When enabled, you must specify an interval, within the range of
1 to
300 seconds. Then, if no measurable scene content change has been detected within the specified time interval, the next frame will be considered a scene change. Note: you are not guaranteed a linear time line with this option, as the Video module discards all frames that are blank or duplicate.
|
7.
|
Establish the Number of SWF frames to capture. Use the type-in box to establish the number of frames, between 1 and 120, to capture from SWF files. The default setting is 60. For SWF files, this setting overrides the Number of frames per second to sample and the Maximum number of frames to sample settings. The If no scene change option doesn’t apply either, because the Xinet Video Engine does not capture an accurate time line for SWF files.
|
|
8.
|
Click the Submit button to register your choices. (New previews will not be built at this time if you use the Submit button.)
|
Click the Submit and Update Previews button if you want to immediately populate the database with new low-resolution videos and key frames.
|
3.
|
Use the Video Encoding pop-up list to select the type of file that will be created. You may choose between:
|
|
4.
|
Use the Video Size pop-up list to set the size (resolution).
|
|
5.
|
Use the check box to determine whether or not the videos will use Padding. If you choose to use Padding, the Video module will apply a black border around the video to preserve the specified video dimensions while also generating the low resolution video at the desired size. Without Padding the video will be scaled to keep the proper ratio and dimensions, but may not be the desired low-resolution size.
|
|
7.
|
Be sure that the Enabled box associated with each format has been checked. You can enable or disable individual low-resolution video entries.
|
|
9.
|
Click the Submit button to register your choices. (New previews will not be built at this time if you use the Submit button.)
|
Click the Submit and Update Previews button if you want to immediately populate the database with new low-resolution videos and key frames.
Note: It is also possible to employ a custom Action to transcode video and audio files from one format to another, allowing options for additional versions. Refer to
Xinet TechNote 0317 for more information.
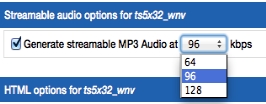
In the Streamable Audio Options section for the volume, choose the desired bit rate for the sampled mp3, options are currently 64, 96, and 128
kbps.
|
•
|
Default page width
The default page width of the hidden browser used to process the file. Its default setting is 1200 pixels, with a possible range of 800 to 1600. If the Video module browcapt(1M) program can determine the real width of the page, it will override this setting.
|
|
•
|
Default page height
The default page height of the hidden browser used to process the file. Its default setting is 1280 pixels, with a possible range of 800 to 4000. If the Video module browcapt(1M) program can determine the real height of the page, it will override this setting.
|
|
•
|
Number of captures
The number of browser captures to be taken. Its default value is 5, with a possible range of 1 to 10. If set to 1, the capture interval won’t be used.
|
|
•
|
Capture interval
The interval (in seconds) between screen captures. Its default value is 5 second, with a possible range of 1 to 30.
|
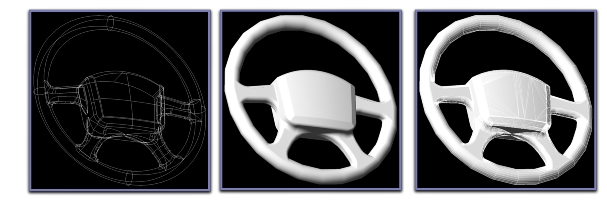
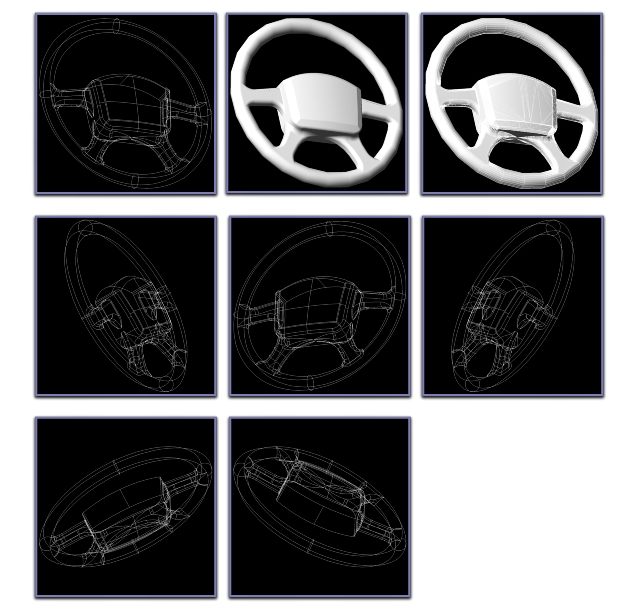
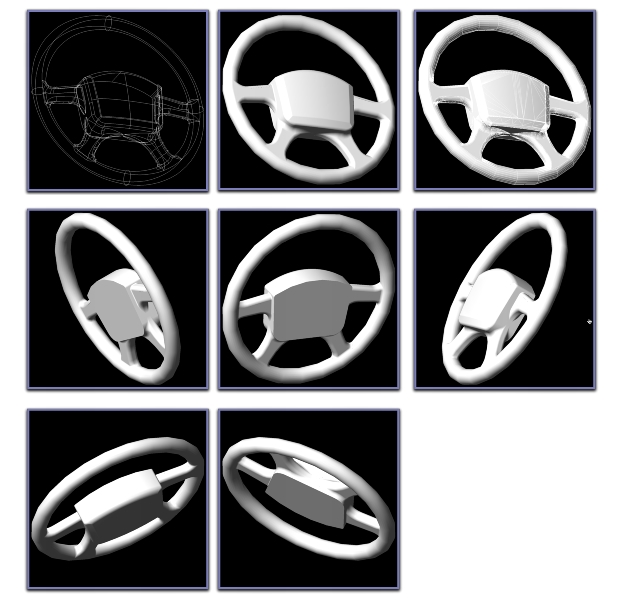
The Video module provides previews for DWG, DXF, Binary DXF, and many versions of ACIS CAD files. Text on each page captured will be indexed. When rendering a 2D file, it will draw the object in wireframe and capture a single image. When rendering a 3D file, it captures three separate images, drawing the object in wireframe, Gouraud shaded and Gouraud shaded with wireframe. In addition, for 3D objects, the Video module provides an option that will rotate a “camera” in 90-degree increments around the X axis, capturing the left, back and right faces, and similarly, around the Y axis, capturing the bottom and top faces. Refer to cad2jpg(1M) and
CAD files for additional details about rendering previews.
How the object will be rendered during rotations depends on settings you will establish in the 3D options portion of the
Video Settings page. The settings will be stored in the
MovieSettings column of the
Volumes table in the Xinet database and will apply only to the volume identified at the top of the
 Video Settings
 page.
|
•
|
Width (in pixels) This establishes a value for the width of the canvas that the Video module will use when rendering previews for CAD files. The default value is 1200 pixels.
|
|
•
|
Height (in pixels) This establishes a value for the height of the canvas that the Video module will use when rendering previews for CAD files. The default value is 1200 pixels.
|
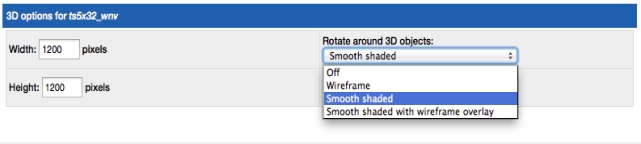
• Off
Rotated views will not be captured. The Video module will, however, produce a wireframe preview, a shaded preview and a shaded preview with a wireframe overlay.
• Wireframe
When rotating the camera around objects, views of the objects will be rendered in wireframe. The Video module will produce eight previews, total, which includes wireframe, shaded, shaded with wireframe and five rotational views.
• Smooth shaded
When rotating the camera around objects, views of the objects will be rendered as Gouraud smooth, shaded objects. The Video module will produce eight previews, which includes wireframe, shaded, shaded with wireframe and five rotational views.
• Generate low resolution videos
When enabled, this option captures low-resolution videos of objects as they rotate around their X and Y axes.
Low resolution video options (explained on
Automatically generating Low Resolution Videos) must be enabled for this to work, and users can only view the results through Xinet Portal. Use the pop-up list to select between
Off,
Wireframe,
Smooth shaded, or
Smooth shaded with wireframe overlay.
update volume set MovieSettings="<?xml version="1.0"?><movsync><enabled>true</enabled><XVE><framesPerSec>1</framesPerSec><generateMaxFrames>3600</generateMaxFrames><keepFirstFrame>true</keepFirstFrame><keepLastFrame>true</keepLastFrame><keepMinFrames>5</keepMinFrames><forcedFrameInterval>0</forcedFrameInterval><scoreThreshold>60</scoreThreshold><numFlashCaptures>60</numFlashCaptures><keepMaxFrames>250</keepMaxFrames></XVE><lowResVideoThreads>1</lowResVideoThreads><LowResVideo><enabled>true</enabled><description>Default Streaming</description><width>720</width><height>480</height><padding>true</padding><quality>H:4</quality><outputFormat>xinetfixed1</outputFormat></LowResVideo><TD><canvasWidth3D>1200</canvasWidth3D><canvasHeight3D>1200</canvasHeight3D><rotateMode3D>4</rotateMode3D><movieMode3D>0</movieMode3D></TD></movsync>" where VolumeID=1;

below:
overlays.
• Generate low resolution videos