Administration Guide : Setting up Xinet Volumes : Creating a new System Volume

Creating a new System Volume
The following steps describe how to set up volumes for both Web and local users. While you could complete each step for many volumes now, Xinet suggests that, in the beginning, you move on through other administration tasks to give yourself an overview of the entire set of tasks before taking the batch approach. This section describes how to create a new System Volume. It also contains relevant information about options when you edit an existing volume.
Note: Non-Venture volumes are not supported for Pilot users. Asset folders will not display in the navigator.
Note: An AFP Volume is still required for SMB shares, if you set up volumes. Xinet automatically uses the same AFP Volume name for the SMB Share.
To create a new System Volume:
1.
Authenticate yourself as nativeadmin, click the Volumes/Users tab at the top left of the GUI and then in the row beneath it, the System Volumes tab. The GUI displays an interactive summary of existing volumes on your server, as shown in the example. in Figure 0-1:
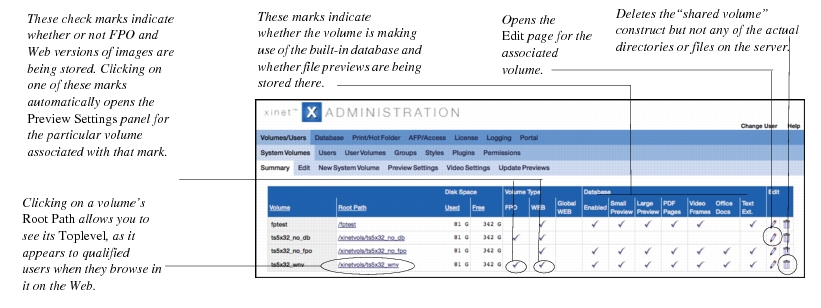
Figure 0-1 Interactive summary of existing volumes
2.
Click on the New System Volume subtab in the third row. You should see an interface such as the one shown in Figure 0-2:
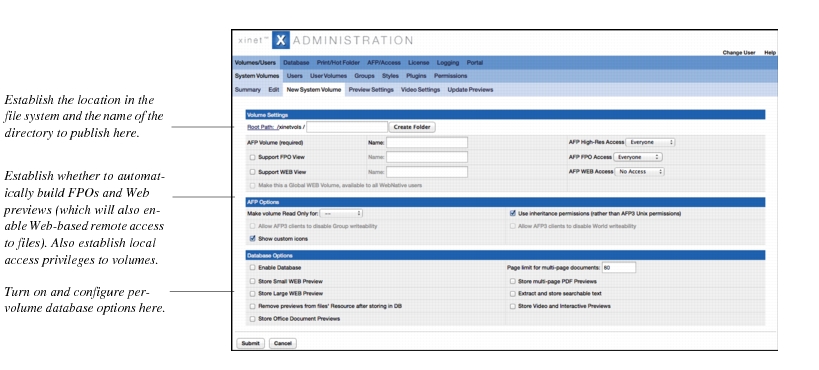
Figure 0-2 Adding a new volume
3.
Use the Root Path pop-up list iteratively to establish the location in the file system and then, the name for the volume you want to “publish.”
Iterative use of the pop-up list allows you to navigate through the file system. For example, if one were to first select space and then use the pop-up list again, the second time, the list would contain all the folders within space, and so on, until the desired volume appeared in the Volume Name box. The successive selections you make will be reflected in the path name just to the left of the pop-up list as you navigate.
The choices you initially see at the root level depend on your operating system. Xinet always hides lost+found directories and some inappropriate system folders that vary according to the operating system.
[optional] You can go backwards, if you change your mind, by clicking on any folder or directory listed in your path, even back to the root if you’d like.
[optional] You can use the New Folder option at the bottom of the pop-up list if you’d like to establish a new folder or directory in the file system. Type the name of the new folder in the high-lighted box and click on the Create Folder button.
Using the Root Path pop-up list to establish the location of the volume in the file system
4.
Type in an Apple File Sharing Protocol (AFP) Volume Name. This is the name local users will see when they mount the volume on desktops.
5.
Support FPO View, Volume Name
This option will create an FPO counterpart to high-resolution views. Enable this on all volumes where you want FPOs pre-made for image replacement workflows.
If you are running Xinet in demo mode, each of the FPO images will be “watermarked.” If you want to purchase a license, get in touch with your Authorized Xinet Integrator or contact Xinet at sales@northplains.com.
You must supply the name that users will see when they mount the FPO view of a volume. It is probably a good idea to include some indication that this is a low-resolution volume, such as using FPO or Low Res in the volume’s name. Type the name in the appropriate box.
Support Web View, Volume Name
When you turn on this option, a separate AFP volume will be available which will contain automatically-generated Web-ready GIF or JPEG versions of images that have been placed in the high-resolution volume. Xinet normally creates a GIF image for any image which contains a clipping path or mask; otherwise, it creates a JPEG-compressed image.
You must turn on this option for any volume you intend to make available via the Xinet browser-based interface. It may, however, be turned on safely at a later date.
You may turn on this option even if you have not yet licensed the full Xinet; however, each of the Web-ready images will be “watermarked.” If you want to purchase a license, get in touch with your Authorized Xinet Integrator or sales@northplains.com.
If you turn on the option, be sure that the names for both the high-resolution volume and the Web-ready volume will be meaningful to AFP clients.
Make this a Global Volume, available to all Xinet users
This option exists to save administrators time when they want all users to have access through the Web to a given volume. You will not have to give permission on an individual or group basis.
If you engage this option, you’ll need to do a bit of extra configuration, described in Step 8.
Use the three pop-up lists to establish High-Res Access Restrictions, AFP FPO Access Restrictions, and AFP WEB Access Restrictions
These options allow the system administrator to manage who will have access via AFP to the High-Resolution, FPO, and Web views of a public volume. See Security settings for details.
6.
Make volume Read Only for:
Read Only lets users open files on the volume but neither modify them nor create new files. You may apply these restrictions using built-in Xinet ACLs (Everyone or --) or using any custom ACLs that have been established on your server. About Access Control Lists provides more information about custom ACLs.
Note: Selecting -- means that everyone will have Read/Write permission on the volume.
Use inheritance permissions (rather than AFP3 Unix Permissions)
Makes permissions act the way they acted prior to AFP3. This setting automatically toggles the other two AFP3 setting to off. Most sites find this to be the most appropriate setting.
AFP 3.1 Unix permissions support options:
Allow AFP 3 clients to disable Group writeability
Allow AFP 3 clients to disable World writeability
AFP 3.1 offers additional support for OS X native permission assignment for files created by clients using that platform. When connecting to the server via AFP 3.1, users will create folders with open permissions for the user but which lack write permission for the group and world. Files made inside those folders will inherit the parent’s permissions (without the execute bit set). This means that only the user will be able to write a file inside a folder that he or she created on the server.
Xinet has changed the default permissions for folders created by AFP 3.1 clients so that they match the permissions generally made by AFP 2.2 clients. Folders will, by default, be open for reading, writing and execution for the user, group and world.
If you wish to change these default permissions for folders created on Xinet volumes, you can do so on a per-volume basis using the Allow AFP 3 clients to disable Group write access and/or Allow AFP3 clients to disable World write access options.
For more information about AFP 3.1, refer to Managing User Connections with Xinet AFP Service.
Show Custom Icons
Macintosh users will see custom icons when looking at a volume in icon view. This includes thumbnail images created by the Xinet or by Macintosh image applications, such as Photoshop.
7.
Use the check boxes to configure whether and how the database operates on the volume. A brief description of the options follows. Keep in mind that if you’ve turned off a user’s ability to access particular previews, his or her experience may not agree with the preview settings you establish here. (Step 3. explains these user-level preview settings.) For the database, you may choose among:
Enable Database
Allows you to turn the database on or off for the selected volume.
Store Small Web Preview
Small Web Previews are the previews which, by default, users see in Xinet’s Short View. Small previews are, at most, 112 pixels in either horizontal or vertical orientation.
Store FPOs (not recommended) [Note: this option will not appear in many installations.]
This option will not appear in new installations, but may be present if you have upgraded from a previous installation. You can also enable it using MySQL command-line options.
Turning on this option keeps downloadable FPOs available to users, even when files have been archived. FPOs will be downloaded from database tables rather than the file system. On the other hand, it also means that your database will consume a lot more disk space since FPOs can be large, depending on their format. If you have limited storage, you might want to balance your use of this option. On Unix systems, by default, the FPO table is limited to storing 16 x 4 (64) gigabytes of data. Windows systems are limited to the amount of space available in the file system.
Store Large Web Preview
Large Web Previews are the larger GIF or JPEG previews whose resolution you determine with the Volumes/Users, Previews link under Options for Large Web Previews. (See Options for Large Web Previews:.) They are typically smaller in file size than FPOs and do not contain image replacement comments.
HSM Sync [Will not appear in most interfaces]
This option will not appear in new installations, but may be present if you have upgraded from a previous installation. You can also enable it using MySQL command-line options.
The HSM Sync option should be used for anyone using a Hierarchical Storage Management (HSM) system. Turning it on will prevent data from being staged when Xinet syncs the database. By default HSM Sync will be turned off.
Remove previews from files’ Resource after storing in DB
This option, when enabled, will decrease file size of assets stored on the particular volume (for example PDF, JPEG and SWF files) when it is sufficient to have previews stored in the database rather than in the files’ Resource forks. This is a good option to consider for volumes which are used primarily for asset management purposes and not for prepress work, since neither the FPO nor Web volume views can be accessed via AFP when previews have been removed from Resource forks.
Store Office Document Previews
This option appears only when OpenOffice.org software or LibreOffice.org software has been installed on the server. (Xinet support for Microsoft Office file previews requires that you install OpenOffice or Libreoffice on your Xinet server. For more information, see Licensing and Hardware IDs.)
See About Microsoft Office Previews for more information. It allows users to preview multi-page Microsoft Office documents over the Web.
Store Multi-page PDF Previews
Storing multi-page PDF previews allows users to click through small previews of pages within multi-page PDF files stored on the volume, as well as preview larger spreads, just as they can with InDesign documents.
(Unlike previews of InDesign, the PDFs do not have to first be saved with a Xinet extension or plug-in in place.) Without this option enabled, users will only see previews of the first page of multi-page PDFs. Enabling this option will use more database resources. You should also enable Store Small Web Previews and Store Large Web Previews when you use this option.
Page limit for multipage documents
If you’d like to change the maximum number of page previews created from a single document from the default setting of 80 pages, type a new number in the Page limit for multi-page documents box. The limit applies to Office documents, PDF, InDesign, HTML, and video files.
Extract and store searchable text
When enabled, this option, working in conjunction with Xinet plug-ins for InDesign, and Photoshop makes it possible to extract and store text from InDesign and Photoshop documents in Xinet’s wnvcontent database. The option also makes it possible to do the same for Office, PDF, Illustrator, HTML, CAD and video files. Xinet Portal offers an interface which allows users to search for any text held in this way in the database, displaying the results with the mview program.
Store Video and Interactive Previews [Not available on all systems]
This option appears only when a server has been licensed for the Video Module for Xinet. It enables the Video Module plug-in for Xinet. When enabled, Xinet will process Video & Audio Previews as well as Web Browser Documents. Please see the Xinet Video Module for Xinet Administration Guide for more information about this feature.
8.
Click the Submit button to register the settings and begin a sync of the new volume.
If you have engaged the Global WEB Volume option described in Step 5., you should temporarily see a previously-hidden subtab, called Global Volume Settings, which will allow you to configure Web-access privileges for the volume. If you need help figuring out these settings, refer to Giving a user Web access to a volume.
Otherwise, if you want to use the default settings for Web preview generation, and you don’t want to generate previews for any pre-existing images stored on the volume, you are done. (At this point, the software generates Web previews for any new image added to the volume, but will not generate them for pre-existing images. There’s an option described below for generating Web previews for all images on the volume.)
For background information about what happens in the database when you add volumes and information about synchronizing volumes, refer to Database synchronization.