Client Guide : Using Xinet Portal : Searching for Assets in Portal

Searching for Assets in Portal
Xinet offers several ways to search for assets:
Solr Search
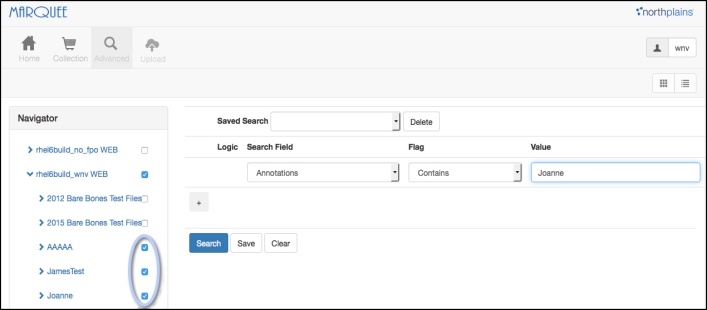
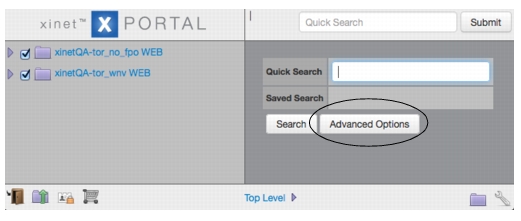
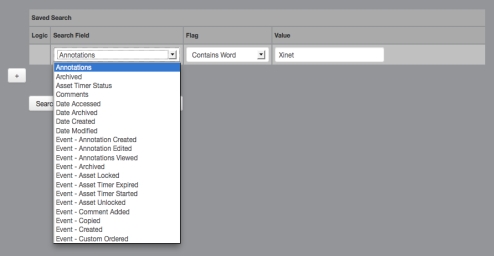
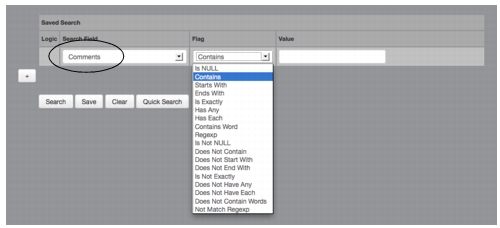
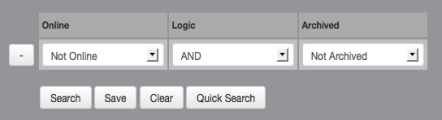
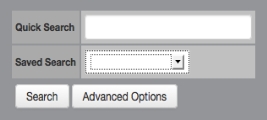
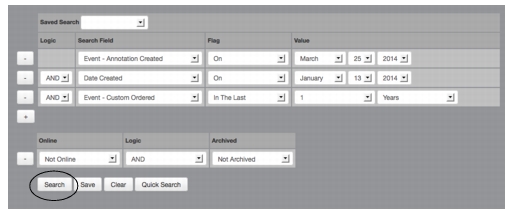
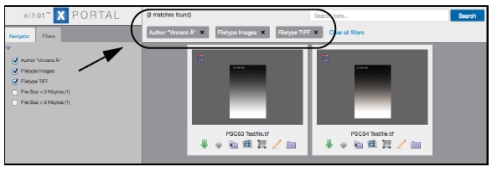
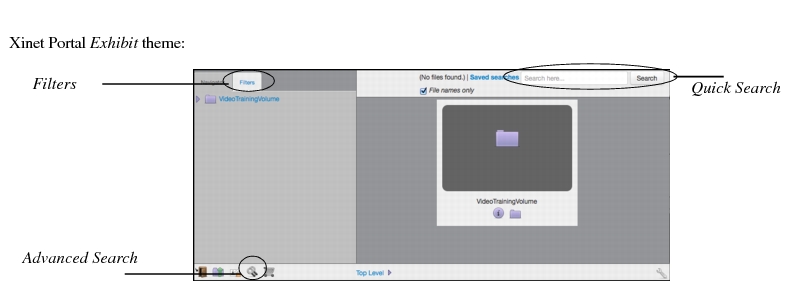
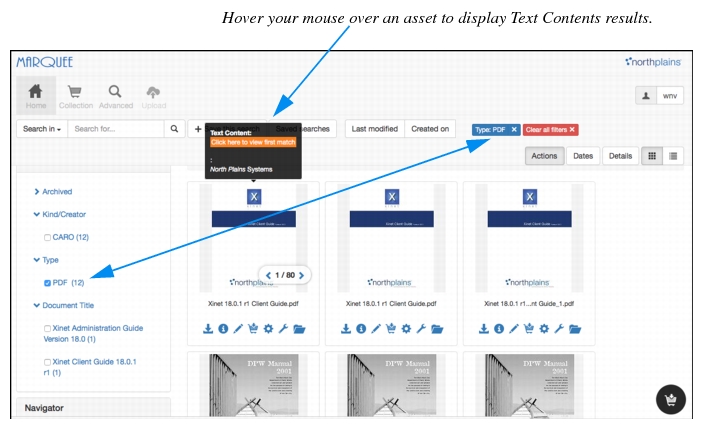
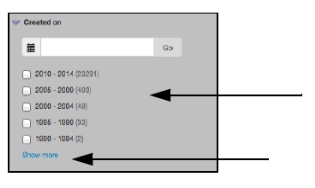
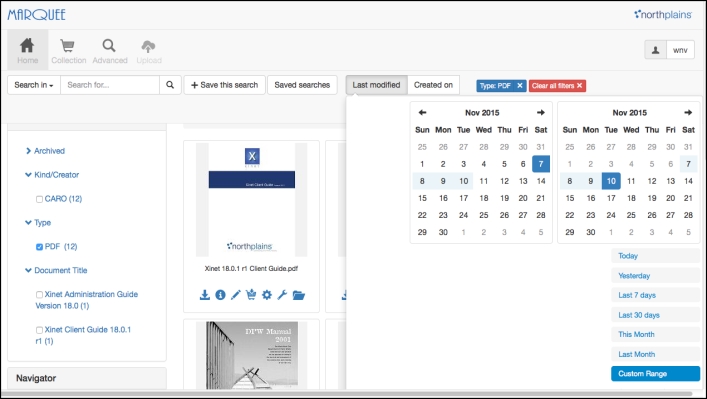
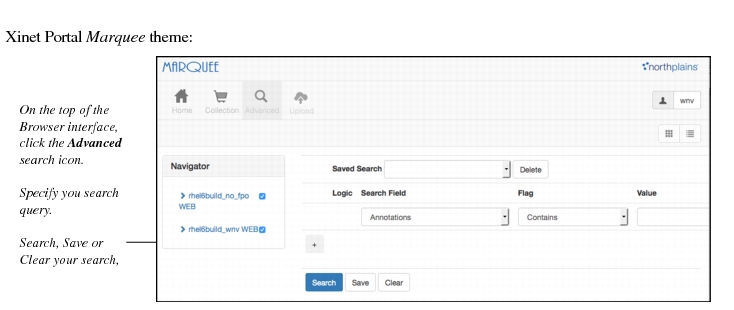
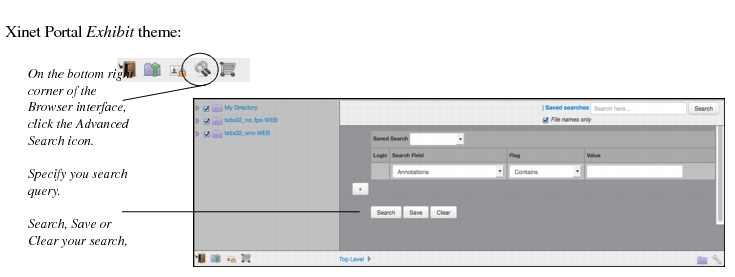
Xinet can now be configured to use the industry standard Solr search engine functionality. Solr search within Xinet enables you to complete global searches using a number of powerful Quick Search options and to refine your search query by specifying metadata facets. For more information, see Using Solr search.
Database Search
Xinet allows you to create your own custom advanced search queries using logical operands. In addition, you can complete simple global searches as well as refine your search results by specifying metadata facets. By default, Xinet enables this search methodology for both Exhibit and Marquee themes. For more information, see Using the database MySQL FullText search engine.
Notes:
If viewers don't see the search fields, they may be able to access full-faceted browsing instead. Full-faceting browsing is available for Marquee sites, and provides a browsing experience where viewers can navigate down into various categories without needing to work with the underlying file system. For information on how administrators can set this up, see Set Up Top-Level Facets (Marquee Only).
When using the Exhibit theme, it is not possible to use both search methodologies on a Xinet server at the same time. Your Administrator must select a search engine for you to use.
When using the Marquee theme, the Solr search engine is enabled when conducting a Quick Search and the database engine is enabled when conducting an Advanced search.
When using the Marquee theme with toplevel faceting enabled, Advanced Search is not available.
Using Solr search
The incorporation of Solr search provides faster and more comprehensive searching, as well as structured filtering of results. You can refine search results using filters, enabling you to zero in on the content you are looking for. In addition, you can save your search queries for later use.
Solr Search locates matches for the specified search value in files names, file attributes (Type and Kind/Creator filters), annotations, keyword metadata, and text content. Note, searching for creation or modification dates in Quick Search is not supported using the Exhibit theme. Use the Last modified and Created On filters to narrow your search results.
When the Administrator has enabled Solr Search, Xinet Portal displays the following Solr search features:
Recommended search workflows:
Complete a Global Search:
Use Quick Search to complete a global search to locate specific assets found on any of your mounted volumes. For more information, see Creating a global search query.
Refined Your Search Results:
Use Filters to refine your search to locate specific assets in a particular volume or directory. For more information, see Refining a search query.
Create Complex Search Queries
Use Advanced Search to construct simple or more complex search queries using logical operants and constraints. For more information, see Creating an advanced search query.
Add found assets to your Collection (Marquee theme only)
Once you have completed a Quick Search or an Advanced search, the 
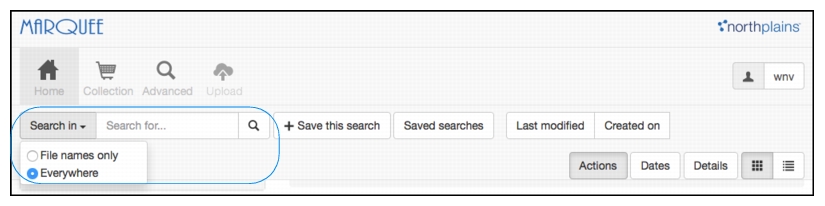
Collection icon appears at the bottom right corner of the Marquee theme interface. Click this icon to add all found assets to your Collection at once. For more information, see Adding and removing assets from the Collection.
Creating a global search query
The Quick Search field allows you to specify a global search query to locate assets found in all volumes displayed in the Navigator.
To create a global search:
Type a search string in the Quick Search field, using any of the quick search options listed below, and click Submit.
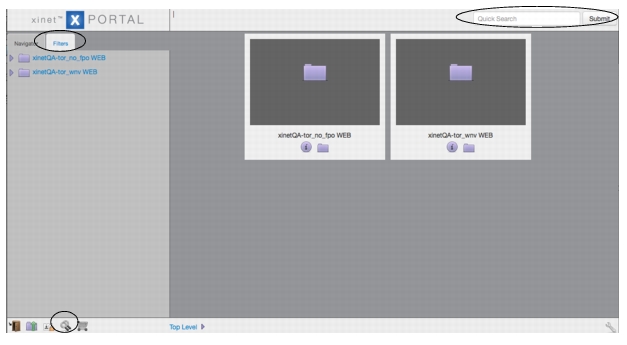
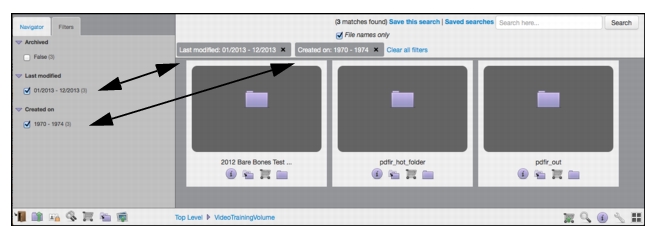
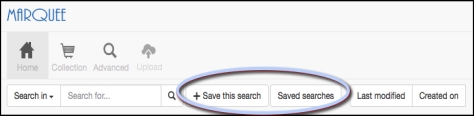
Note: Portal Marquee theme users have the option to filter their quick searching by selecting either File names only or Everywhere.
Assets found are displayed in the Portal view and the Filters tab displays associated metadata and the number found.
Quick search query options
The following Quick Search query options are available:
File names only/Everywhere
Refine your search results by enabling the File names only check box. Quick Search will search for files using the specified file name. Found matches are sorted by relevance. The best match is listed at the top of the list. For Portal users using the Marquee theme, you can select File names only or Everywhere to find results from the Top Level.
Search for Strings and Numbers
For example, IDC15.
Note: By default, Xinet supports Solr stemming for filenames, strings, keyword metadata, and text content. Stemming is used to find index entries in the database containing the root form of a word. For example, if you type the word Stem, the Solr stemming algorithm may locate index entries such as Stemming, Stemmed, and Stem.
Search for an Exact Word or Phrase
For example, “Foo Bar”
Search for Assets using Wildcard Matching
For example, Foo*Bar locates all assets using Foo + whatever + Bar.
Search for Assets using Boolean Operators
Use the OR, AND, or NOT operators to search for assets.
Note: These search options are not case sensitive.
Tip: When typing a search term without using any operators, the OR operator is used by default.
For example, in my asset database I have the assets My House.jpg, John Smith.jpg, and Joanne Doe.jpg. Searching for the following, house OR Joanne, returns both MY House.jpg and Joanne Doe.jpg.
For example, searching for Joanne AND Doe returns the asset using both terms, Joanne Doe.jpg.
For example, Tree NOT Plant returns all assets using the term Tree and not using the term Plant.
Grouping Boolean Operators
Use a combination OR, AND, or NOT of Boolean operators to control the logic of your query.
For example, to search for Foo OR Doe AND Tree, returns assets that use Tree and either term Foo or Doe.
Exclude a Word from Your Search Query
Note: This search option is not case sensitive.
For example, Foo -Bar. This search query returns all assets using the term Foo except those using the term Bar in their filenames, file attributes, metadata, or text content.
Search for Assets that Must Contain a Word
Note: This search option is not case sensitive.
For example, in my asset database I have three assets; My House.jpg, Joannes House.png, and Joanne Doe.jpg. Searching for the following, house +Joanne, returns JoannesHouse.png and Joanne Doe.jpg.
Sort the Specified Search Results by Specifying a Boost Factor
For example, in my asset database I have assets called Hickory Tree.jpg and Chicory Plant.jpg. Searching for Tree Plant ^2, displays Chicory Plant.jpg as the first asset listed in the display area followed by Hickory Tree.jpg since we have boosted the term Plant. Removing the boost factor value reverses the order displayed since Tree is the first search term in the query.
Search for a Word Within the Proximity of Another Word
For example, to search for the word Xinet and Interchange within 10 words of each other in a document, use the search “Xinet Interchange”-10.
Search for Similar Terms Used by Assets
For example, in my asset database, I have assets called Hickory Tree.jpg, Chicory Plant.jpg, and Joanne Doe.jpg. Searching for Hickory~ returns both Hickory Tree.jpg and Chicory Plant.jpg because both terms Hickory and Chicory are similar.
Tip:
Search for Terms in Data Fields
In Quick Search, it is possible to perform Solr searches of particular data fields via search query parameters.
solr:Country:(USA)
solr:Byline:"Smith"
solr:Iptc4xmpCore:CreatorContactInfo.CiAdrRegion:"Africa"
The data field can also be a built-in Solr field name such as: annotations, annotationscomment, annotationsstamp, annotationstext, archived, comments, createdate, creator, dir, fileid, filter, fullpath, fullpath_sort, modifydate, online, parentfileid, parentfolder, parentpathids, pathid, textcontent, type, utf8name, utf8name_sort, volid.
For example,
solr:annotationstext:(Approved)
Tip:
Refining a search query
Complete a refined search to locate specific assets in a particular volume or directory. Use the navigator to select a search location and then use the Filter tab to refine your search by selecting particular facets. Facets are based on the available metadata of the displayed assets.
Numbers are listed beside each facet in the Filters tab. These numbers indicate the total number of assets found using a particular metadata facet. Selecting additional facets updates the numbers to reflect the combination of your faceting criteria.
The following example outlines how the interface updates, in the Filters tab, when selecting different facets to refine a search query. By default, all facet results matching a search are listed in the Filter tab. The total number of assets found is listed in the top the view. The selected facets are also listed. The total assets found to match the initial search query are displayed, the count and facet filter name is listed at the top of the interface. As you select other facets, the filter tab updates to reflect the search results of your selection. Each facet listed displays an updated number, reflecting the total of the combination of facets selected.
Note: The list of facets displayed on the Filter tab varies depending on the metadata applied to an asset and what the Administrator has defined for your Portal users’ view. All found custom facets (Data Fields), created by the Administrator, will also appear in the breadcrumb path beside the Created on date and Modified on date. In addition, as an Administrator, the number of facet types displayed in the Filters panel can be customized.
For more detailed information, see the following topics in the Xinet Administration Guide
The following is a list default built-in facets:
Select Approved., Confidential, Department, Draft, and/or Experimental to refine your search.
Select True to refine your search to list archived files.
Select False to refine your search to list non-archived files.
Select a four character string to view a list of the assets created by a particular Macintosh application.
Click Show More to see a full list. Use the scroll bar to review this list.
Select one or more file types to refine your search.
Click Show More to see a full list. Use the scroll bar to review this list.
Last Modified:
Using the Exhibit theme, the following Last Modified options are available:
Select one or more system last modified dates listed to refine your search.
Click Show More to see a full list. Use the scroll bar to review this list.
Alternatively, select a date by clicking on the calendar menu to select a predefined date range or create your own custom date range. The specified dates are displayed in the FROM and TO fields. Click Apply.
Select a predefined date option from the menu and click Apply.
Click Custom Range to create your custom date range and click Apply to view the results.
Created on:
Using the Exhibit theme, the following Created on options are available:
Select one or more system creation dates listed to refine your search.
Click Show More to see a full list. Use the scroll bar to review this list.
Alternatively, select a date by clicking on the calendar menu to select a predefined date range or create your own custom date range. The specified dates are displayed in the FROM and TO fields. Click Apply.
Using the Marquee theme, the following Created on options area available:
Select a predefined date option from the menu.
Click Custom Range to create your custom date range and click Apply to view the results.
To refine your search:
1.
2.
Click the Filter tab on the navigator.
A list of the facet names and counts are displayed.
3.
4.
For Marquee theme users, click Last Modified on or Created on, specify a date, and click Apply.
The search result is refreshed and displayed in the Portal view.
Using advanced search
To create advanced search queries, using logical operants and constraints, use the Advanced Search function located at the bottom left corner of the Portal display. For detailed information on how to create simple or complex advanced search queries, see Creating an advanced search query.
Saving a search query
You can create several search queries and store them for later use. Saved search queries are shared with all users using the same Portal server.
Note: If you do not see saved searches created by other users using the same Portal server, contact your Administrator. The Site Manager > Edit Site > Configuration option, Allow sharing of saved search between users sharing primary server, must be enabled.
To save a search query:
1.
The Save Search dialog box is displayed.
2.
In the Search Name field, type the name of the search.
3.
Optional - In the Description field, type a description of the search.
4.
Click Submit.
To clear individual filters:
Click (X) beside each filter you want to remove
.
The number of total assets found is updated in the header and the Filter tab is updated.
To clear all filters:
Click Clear all filters.
To return to the top level of your volume tree:
Reusing a saved search query
Saved Search queries are shared with all users on a Portal server.
To reuse a saved search query:
1.
A list of saved searches is displayed in a dialog box.
2.
The results are displayed in the Portal view.
Deleting a saved search query
Saved search queries are common to all users using the same Portal server. You can delete your unwanted saved search queries. You cannot delete search queries created by other Portal users.
To delete a saved search query:
1.
A list of saved searches is displayed in a dialog box.
2.
Click the Delete icon to remove a selected saved search query.
Using the database MySQL FullText search engine
The Xinet Full Text Search engine offers you the ability to complete global searches, use filters to refine your search, and conduct advanced search queries using logical operands.
When the Full Text Search Engine is enabled, Xinet Portal displays the following features:
Recommended search workflows:
Use Quick Search to complete a global search to locate specific assets found on any of your volumes. For more information, see Creating a simple global search query.
Use the Advanced Search option to create complex search queries using logical operands. For more information, see Creating an advanced search query.
Use the Filter tab to refine your search results to locate specific assets in a particular volume or directory. The Filter tab lists a number of facets that are based on metadata assigned to an asset. For more information, see Refining a search query.
Creating a simple global search query
Use the Quick Search to locate specific assets on any of your volumes. The following are examples of search strings used and their results.
To complete a quick search:
Assets found are displayed in the Portal view.
Tips:
Note: If your results are not recognizing case sensitive words, your user configuration settings require updating by your Administrator.
Creating an advanced search query
Conduct complex searches using the Advanced search options to refine your search query. The following is an example using the Exhibit theme. The same functionality is available for Portal users using the Marquee theme.
Note: Marquee theme users can complete an Advanced Search using any of the following methods:
All Mounted Volumes: Selecting the Advanced Search icon on the Home level of the browser interface to search for assets on all mounted volumes.
Selected Folders: Selecting individual folders in the navigator and then clicking the Advanced search icon on the Home level of the browser interface to conduct a search in specified folders.
Selected Volumes: Selecting a volume in the Home browser view and then click the Advanced Search icon on a specific volume to locate assets in the selected volume.
To complete an Advanced Search using the Marquee theme:
1.
Click Advanced on the top of the browser view to conduct a global advanced search on all mounted volumes.
2.
Optional - Click on one of the mounted volumes listed in the browser view and then click Search to conduct an advanced search in the selected volume.
Optional - Click Advanced, open the navigator, expand a volume, and select a folder or folders to search in, then click Advanced.
3.
On the Search Field menu, select the logic operator.
4.
On the Flag menu, select an option.
5.
In the Value menu box, type a value to query.
6.
Click the plus icon to add more logic to your query.
7.
Optional - Click Save to save your search query to use at a later time.
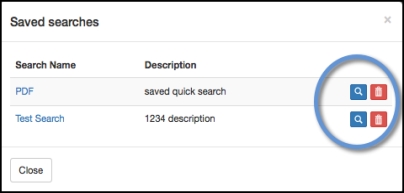
For more information about saving searches, see Saving a search query.
8.
Click Search.
To learn more about logical constraints, see Constraining searches.
To complete an Advanced Search using the Exhibit theme:
1.
2.
Click Advanced Options.
3.
Under the Search Field, click the drop down menu, and select a data field option.
4.
Under the Flag field, select a logical constraint.
For more information about the logical constraints available, see Constraining searches.
5.
Under the Value field, type the value you are searching for.
6.
7.
Under Logic field, click the drop down menu, and select a logical operand.
For more information about available operands, see Logical Operands.
8.
Tip:
9.
Click Search to review your results.
Constraining searches
You can construct simple or more complex searches using logical constraints. Depending on the Search Field selected in the Advanced Search drop down menu, logical constraints will vary. The following is an example of the constraints for the search field Comment.
For example, if you were to conduct a Has Any search on the string, blue yellow green brown fox, the search engine would search for any of these five tokens. However, if you were to conduct the Has Any search on the string blue yellow green “brown fox”, the search engine would consider the sequence “brown fox” as a single token, with the space included and search for four tokens.
Works using the same token concept as Has Any, except every token in the search query must be present for a file to be included in the search results.
Appears when users conduct Search All Indexed Fields queries and works using the same token concept as Has Any. While each token within the query has to be found before a file or folder will be included in the search results, the tokens do not have to be in the same field. Some may be found, for example, in the filename; others in various Data Fields or in the content of text within files. The query will return search results as long as the tokens are all found in the entire set of fields through which the user has permission to search.
Returns matches when the search token matches a full word. For example, if the Contains Word search were for the string test, the query would find the files this is a test.jpg and another test file.pdf, but wouldn’t find testing.tif nor tester.gif. A normal Contains search with the string test would find all four of these files.
Allows users to enter a Regular Expression, as defined at http://dev.mysql.com/doc/refman/5.1/en/regexp.html.
Returns matches that are NULL (where data has not been entered). Only possible without a FullText Index, and not applicable to some fields. For example, it doesn’t make sense to have a Filename with nothing in it, nor to Search All for nothing.
Returns matches whenever all of its operands are true. Also known as the logical conjunction.
Returns matches whenever one or more of its operands are true. Also know as the logical disjunction or inclusive disjunction.
The exclusive OR (XOR), also known as the exclusive disjunction logic operand, probably won't get used much. It translates simply as “one or the other, but not both.”
NOT serves as an operand modifier. The Not modifier can also be used in conjunction with Is NULL to search for fields that have any value at all, i.e., is NOT NULL.
Tip:
NOT provides a powerful Search constraint
Some Searches allow for NOT to be specified, for example, allowing you to find all images in a group that are not CYMK TIFFS or all assets that have not be marked Approved. Using the NOT with an IS NULL value in a Search can be especially powerful, allowing a user, for example, to recover all values that have been previously applied to a particular keyword. A Search can also use NOT to turn a greater-than Search into an equal-or-lesser-than search.
Logical Operands
Very complex searches are possible when one search is strung to another using the logical operands AND, OR, and XOR. In such cases ORs and XORs are always evaluated after ANDs. Here are a few examples:
Search 1: A and B or C
(This is possible in a single search because ANDs are always processed before ORs.)
Search 1: B or C
Search 2: A and Search 1
Search 1: A or B
Search 2: C or D
Search 3: Search 1 and Search 2
Search 1: A and B or C and D
Search 2: E or F
Search 3: Search 1 or Search 2 and G
Searching for deleted items when collecting information for reports
While most users don’t want searches to return deleted items, there are times when this can be useful, such as when compiling reports. It is possible to retrieve this information from the database, searching for assets that are neither archived nor online.
To create a search query to include deleted items:
1.
The Online options are displayed.
2.
Set the Online option to Not Online, Logic to AND, and Archived to Not Archived.
3.
Click Search to see the search results.
Saving advanced search queries
You can create several search queries and store them for later use. Saved searches are shared with all users using the same Portal server.
Note: If you do not see saved searches created by other users using the same Portal server, contact your Administrator for permissions to view them.
To save an advanced search:
1.
2.
In the Save As field, type the name of your search.
3.
In the Description field, type a description.
4.
Click Save and Search.
To edit an advanced saved search:
1.
2.
3.
Click Save.
4.
5.
Optional: Type a description.
Reusing saved searches
Saved Advanced Search queries are available to all users in the same user group, using the same Portal site. You can access saved search queries in Quick Search and Advanced Search interface.
Note: Quick Search and Advanced search do not share saved search queries.
To reuse a saved search in the Quick Search interface:
1.
2.
.
3.
The selected query is displayed in the Advanced Search interface. The following is an example:
4.
Click Search.
To reuse a saved search query in the advanced search interface:
1.
2.
Click Search to review the query results.
To delete a saved advanced search query:
1.
2.
Click Delete.
Refining a search query
Refine your search results by selecting facets in the Filter tab. Depending on the data fields assigned by your Administrator, facets listed in the Filters tab will vary. Each facet selected displays a value of the total assets found beside the facet name. Each additional facet selected in the Filters tab recalculates the combination of assets found using the selected facets and lists other available facets assigned to the filtered assets found.
To refine a search query:
1.
2.
The results are displayed in the Portal view. The count values for the found assets assigned facets are displayed beside the facet names in the Filters tab.
3.
The results of the assets using the combination of facets specified is displayed in the Portal View. In the toolbar, at the top of the Portal view, the selected facets are displayed. In addition, the counts for each facet assigned to the assets found are recalculated in the Filters tab.
FIGURE 1. Xinet Portal Exhibit theme - breadcrumb trail