|
1.
|
Click on the Database, Trigger Sets subtab. You will see a summary of all Trigger Sets on the system.
|
The Trigger Set Summary presents a list of all of the configured
Trigger Sets sorted alphabetically by the
Trigger Set name. The description (which you add when you create or edit a
Trigger Set) and its
Active Paths are included in this view.
The Trigger Set Active Paths view shows the same data as the
Trigger Set Summary window, but sorts the information alphabetically by the
Active Path. This view is supplied to assist with troubleshooting the system if an
Action occurs unexpectedly or in an unexpected path.
The Trigger Set Details view provides a summary of all
Actions that occur inside an
Trigger Set. Again, this overall view of all
Trigger Set Trigger Rules is provided for administrator reference and to assist troubleshooting.
In the Summary Trigger Set view, you can edit the
Trigger Set by clicking on the pencil icon associated with it.
|
2.
|
To add a new Trigger Set, click on the New Trigger Set subtab.
|
|
5.
|
If it’s more convenient, use the Copy Trigger Set pop-up menu to specify an existing Trigger Set to copy. If you copy an existing Trigger Set, the Trigger Rules and Actions in your Trigger Set you are building will be copied from the selected Trigger Set in the pop-up list. The Active Paths, however, will not be copied to make sure you do not inadvertently have two Trigger Sets performing precisely the same Actions in the same locations.
|
|
6.
|
Click the Add and Edit button so you can configure your Rules for your Trigger Set. A window similar to the one below will open. This is where you configure your Rules. 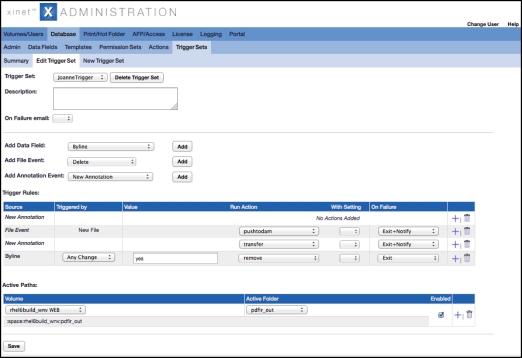
|
|
7.
|
[optional] Select an email setting from the On Failure email pop-up list to establish where Xinet will send notification if any Action in the Trigger Set fails to execute properly. This setting will be used if you opt to Exit and Notify when configuring Actions for a Trigger Rule.
|
|
8.
|
[optional] Add a new data field to the Trigger Set by selecting the data field from the Add Data Field pop-up menu. Then click Add. The new field will appear in your list of Trigger Rules so you can establish appropriate parameters for it.
|
• The Data Field or
File Event
• [optional] The
Value that release the Trigger
If the Data Field you added to the
Trigger Rules has a data type of
Date, then the
Triggered by options will be relative to the value of that field. These
Date Triggers will execute
Actions at specific times.
For example, you could create a Data Field within Xinet called
Timestamp with a data type of
Date. You could then create a
Trigger Set to execute some
Action at some specific date/time, e.g., at a week before, at 12 hours after, etc.
If the Data Field does not have a data type of
Date (for example.
Text, Integer, Floating Point, or
Boolean),
Actions will only be triggered by
Any Change,
Change To, or
Change From.
Any Change, will execute the
Actions in the
Trigger Rule if any change occurs to the value of the
Data Field. Change
To, will execute the
Actions when the value is changed to match the entry in the
Value column.
Change From, will only execute the actions if the
Data Field previously contained the entry in the
Value column and has been changed to a different value.
If multiple Trigger Rules within a single
Trigger Set match a condition, both of these
Trigger Rules will execute their
Actions. For example, if you configure a
Trigger Rule to execute when a boolean field
Approved changes to
Yes,
and you configure another
Trigger Rule to execute when the same boolean field is changed from
No, then both
Trigger Rules will execute their
Actions concurrently when the field is changed to value
Yes.
Each Trigger Rule may execute multiple actions in sequence. For example, if you want to send an e-mail and then transfer a file via FTP to a remote server from a single change in the Xinet database, first add the
email Action and its settings to the
Trigger Rule. Then, click the + sign next to the
Trigger Rule to add another action to the
Trigger Rule. If you want to run an
Action between two previously configured
Actions, click the + sign to the right of the first of these
Actions. The new
Action will insert between the two.
To remove an Action from a
Trigger Rule, click the trash-can icon next to that
Action. To remove a
Trigger Rule, first remove all
Actions from the
Trigger Rule. Then, click the trash-can icon next to the
Trigger Rule.
|
9.
|
When you first create a Trigger Set, the Active Paths will be “null.” This Trigger Set will never execute Actions if the Active Paths are “null.” Therefore, to activate your new Trigger Set, you must specify Active Paths. Only database fields or file system events for files that exist within those Active Paths will qualify to execute the Trigger Rules within the Trigger Set.
|
To add Active Paths to the
Trigger Set, use the pop-up lists at the bottom of the page. These allow you to assign as many
Active Paths as you wish to your new
Trigger Set:
Use of the Active Paths pop-ups resembles Xinet
Volumes administration. First, select a volume in the
Volume column. After you have selected the volume, use the
Active Folder list to select a subdirectory of that volume. Click
Save to save your changes. You may add more
Active Paths to the
Trigger Set by clicking the + sign next to the last path in the
Active Paths list. To delete an
Active Path, click the trash-can icon next to that
Active Path.
