Administration Guide : Set Up the Xinet Server to Use SAML2.0-based Single Sign On (SSO)

Set Up the Xinet Server to Use SAML2.0-based Single Sign On (SSO)
Use SAML2.0-based Single Sign On (SSO) support for a smoother user experience, higher security and easier integration with Third Party software.
Prerequisite: Enable SSL on the Apache server
There will be a requirement to enable SSL on the Apache server. On Linux this is as simple as:
yum -y install mod_ssl
A likely missing library is lasso. Install it by running this command:
yum -y install lasso
Remember to restart Apache after any change to the configurations.
Configure SAML for the Xinet server
On the Xinet server, you will need to add the Xinet SAML auth module (based on mod_auth_mellon) in order to support the new Apache Authentication module. Do not use yum to install the mellon module. It will not work. The Xinet module has been modified to accommodate Portal sites and will conflict with the mellon module.
Install mod_auth_xinet saml.so library
Xinet provides a modified mod_auth_xinetsaml.so library that supports Portal sites. Get the correct version for your server (Redhat 6 or 7 is supported) and put it on your Xinet server. We recommend using this location: /etc/httpd/modules/xinet/
Check to see if all the needed libraries for mod_auth_xinetsaml.so are installed:
cd /etc/httpd/modules/xinet
ldd mod_auth_xinetsaml.so
If there are libraries that are not found, create the dir and install them.
mkdir /etc/httpd/modules/xinet
Create Entity ID names
You will need to create Entity ID names for the SPs (remember that the Xinet server and each Portal Site are all Service Providers or SPs). These names are arbitrary strings but they do have to be known by the IdP and must be unique compared to any other SP that the IdP serves. We recommend using only alphanumeric characters and the period.
For example, we used names similar to the following:
xinet.XinetServer.webnative
xinet.PortalServer.Marquee
xinet.PortalServer.Exhibit
Set up XML exchange between the IdP and SPs
For Google IdP, the XML Metadata must be obtained from your Google account Administrator.
Copy the displayed XMP to a file on the Xinet Webnative or Portal server.
The location of the IdP's XML file on the WNV server is arbitrary, but it shouldn't be public. An example would be creating /etc/httpd/xinetsaml as user "apache", mode 700, and copying the XML to idp-metadata.xml in that folder.
Generate XML for the WebNative Server SP
Use the Xinet-provided script mellon_create_metadata.sh to generate the necessary output.
./mellon_create_metadata.sh <EntityID> http://<WNHOST>/webnative/mellon
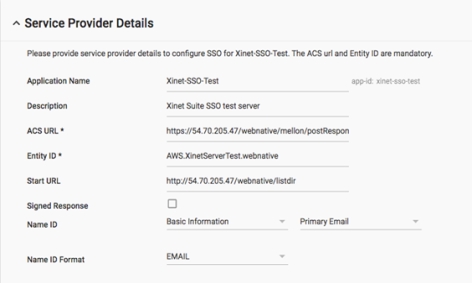
Values you will need to provide are EntityID of the SP that you created in the Create Entity ID names section and the hostname or IP address of your Xinet server.
Here's an example command line where EntityID is xinet.15.webnative and host machine IP address is 192.168.0.15:
./mellon_create_metadata.sh xinet.XinetServer.webnative http://192.168.0.15/webnative/mellon
Here's an example of the output of this command:
Output files:
Private key: xinet.15.webnative.key
Certificate: xinet.15.webnative.cert
Metadata: xinet.15.webnative.xml
Host: 192.168.0.15
 
Endpoints:
SingleLogoutService: http://192.168.0.15/webnative/mellon/logout
AssertionConsumerService: http://192.168.0.15/webnative/mellon/postResponse
Update the IdP machine
The Google IdP requires the following information:
Note: Google IdP requires https for the ACS URL.
Copy the .cert and .key files to the Xinet server
The .cert and .key files created by mellon_create_metadata.sh need to go where Apache on the Xinet server can access them.
Copy the .cert and .key files to /etc/httpd/xinetsaml on the Xinet server and remember this location. Again, the location is arbitrary, but make sure to remember the location as it will be used in the Add Mellon entries to httpd.conf section.
Add LoadModule auth_mellon_xinetsaml entry to httpd.conf load
This entry points to the location of mod_auth_xinetsaml.so that was determined in the Install mod_auth_xinetsaml.so library section.
To create the conf file to load the module, /etc/httpd/conf.modules.d/10-saml.conf, run:
echo "LoadModule auth_mellon_module modules/xinet/mod_auth_xinetsaml.so" > /etc/httpd/conf.modules.d/10-saml.conf
Note: If /etc/httpd/conf.d/10-auth_mellon.conf exists, delete it. It also means the standard mellon auth module had been installed on this machine!
Next Step: