Xinet tries to establish logical default settings for queue configuration when you add a queue to the server. However, in many cases you may wish to change these settings. The Print/HotFolder, Print Queues, Edit Queue page shows the current settings for each established printer queue and allows you to change parameters for it. Because different types of queues handle jobs in different ways, the options displayed in the dialog box will be different according to the kind of queue you are examining.
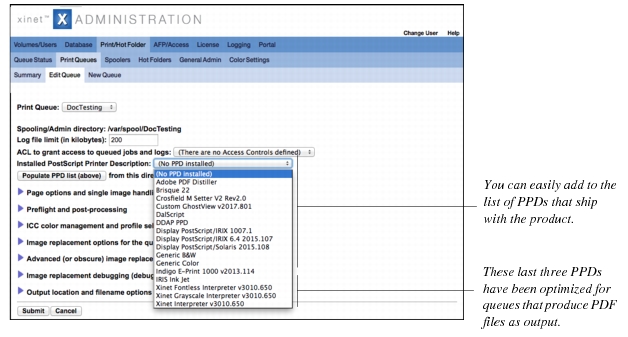
Xinet will establish a separate spooling (printer administration) directory for each printer queue you establish. The Edit Queue page displays the path to the directory associated with the queue you’ve selected. While information from the directories’ files will be available in various parts of the
Xinet Administration view, it is sometimes expedient to look at the directories by hand.
The files in each spool directory contain information drawn from the PPD assigned to the queue, a summary of settings established through nativeadmin configuration, current and old log files about the queue’s activities. and information about the current state of the queue, for example., whether it is idle, currently processing jobs, on hold, etc.
Unix: /var/spool/Print_Queue_Name
Windows: C:\Program Files\Xinet\FullPress\Admin\spool\Print_Queue_Name
By default, newly-established queues will have a Log file limit set to 200 kilobytes. If you turn on verbose logging or want to keep logging information for longer periods you may change the limit, on a queue by queue basis, using the
Log file limit type in box.
The upper portion of the Edit Queue page allows you to review and specify which PostScript Printer Description (PPD) will be used by the queue. The PPD provides information about the printer, such as what fonts are available, the level of the PostScript interpreter, page sizes, etc. For many printers, Xinet will automatically pick the correct PPD.
Unix: /var/adm/appletalk/ppds/
Windows: C:\Program Files\Xinet\FullPress\Admin\ppds\
|
2.
|
[optional] If you have chosen a different repository for PPDs on your server, use the path segments that follow from this directory and then, the Folders pop-up list in an iterative fashion until you have correctly specified the new PPD repository.
|
|
3.
|
Click the Populate PPD list (above) button so that Xinet can register new PPDs.
|
Use the disclosure triangle to reveal these options. You can turn on or
off the following printer configuration options by clicking in the box next to each option. A check or darkened box means the option is “on.”
|
•
|
Default Paper Size
Depending on the PPD assigned, the page may provide a pop-up list that allows you to choose the default paper size for the queue from among the possible sizes specified in the PPD. The size you specify will be the size used unless other information provided during the printing operation overrides it.
|
|
•
|
Scaling for jobs that are single images
The options is this pop-up list control how EPSF and raster image files are printed; the settings do not effect ASCII text printing. The options include: – Scale (up or down) to fill page
– Scale down only
– Do not scale at all
– Set the page size to match the image
– Do not convert EPS to PostScript
If you choose Scale down only and the image is larger than the page, it will scale it down so the image will fit the page. If Do not scale at all is chosen and the image is larger than the page, it will be cropped. The scaling options will only affect images directly sent to the printing device and will not affect images that are imported into another type of file, such as a InDesign layout file.
|
Page layout
(Options include
Single page Portrait, Single page Landscape, Two-per-page Landscape, and
Two-per-page Portrait) Click on the option you prefer.
Text Columns per virtual page
Allows you to specify the number of characters per column and the number of rows you want to appear on each virtual page.
Use ISOLatin1Encoding in PostScript font for text
Allows you to extend the range of characters in fonts beyond those normally represented by a 7-bit ASCII encoding system; for example, you might need special ligatures and accents or non-Roman fonts. By default, Xinet turns on this option. ISOLatin1Encoding is the standard extended encoding scheme used by the
X Window System, and for that reason, will be found on most printers. A few printers, however, do not support ISOLatin1Encoding. If you are using such a printer you should turn off this option.
These options, similar to many Macintosh printing options, only pertain to jobs which do not come into the system via the papserver(1M) or
lprserver(1M) utilities. They don’t apply to PostScript files from Hot Folders either. What you see in the box depends on the options described in the selected PPD. However, most PPDs contain two options which Xinet uses for printing ASCII text files. You should check, if present, that these settings are correct.
Page size
(depending on other input-tray selection options, defines page size for default paper tray or selects paper tray)
Page region
(defines the imageable area for manual feed and when users specify special input trays)
|
•
|
Forward Job on success to
This option allows you to direct the input for jobs which successfully clear the print queue to another previously configured queue. The menu allows you to choose among all other queues previously configured on your server.
|
|
•
|
and on failure to
This option allows you to direct the input for failed jobs to other queues, such as a hold queue or to a previewer. This may be useful when you want to look at problems in the PostScript you’re producing. The menu allows you to choose among all the hold or preview queues previously configured on your server.
|
Tip: Many customers use job forwarding as a way to remove chances for errors and to streamline production. A single PostScript file or PDF file can be used to create multiple kinds of output. For instance, a layout person can print one time to a queue. The queue can replace images at 72 dpi and make a PDF file which is written into an area where the customer can log in through Xinet and soft proof that PDF. Or, the queue’s first destination might instead be a proofer (or even a remote proofer owned by the customer, with the printing happening over the Internet) — and then that printer queue’s success destination could be a hold queue for the image setter.
Before enabling any color correction features, you may want to read more about Color Vérité and color management, as described in Setting global input ICC profiles. Also keep in mind that associating a profile with a printer queue is only one part of setting up color management on your system. Images must also have profiles associated with them.
|
2.
|
Engage the Use ICC profiles embedded in images check box to turn on the option. 
|
|
3.
|
[optional] Some sites only apply color transformations to RGB and LAB images. If you want to take this approach, also engage the option to exclude CMYK images from color adjustment.
|
|
5.
|
[Optional] If you don’t see the profile you want, copy your new ICC profile to an appropriate place on your server. Xinet uses the following as its default location:
Linux: /var/cms/profiles
OS X: /System/Library/ColorSync/Profiles
|
|
6.
|
[optional] If you have chosen a different repository for profiles, use the path segments that follow from this directory and then, the Folders pop-up list in an iterative fashion until you have correctly specified the new profile repository.
|
Click the Populate Profile list (above) button so that Xinet can register new profiles.
|
7.
|
[optional] Use the check box, Do not perform CMYK-to-CMYK color conversions, if you want to protect CMYK images from automated color corrections.
|
|
8.
|
[optional] Use the check box to Enable Black Point Compensation when converting pixels. This feature addresses problems that occur because of the varying darkness of black on different devices. It may help retain some detail in dark (shadowed) areas of images during color transformation. Without its use, unless you’re using a Perceptual Rendering Intent, the conversion process won’t consider Black. Black Point Compensation may also be effective when Profiles don’t accurately portray devices. You will have to experiment with how much it improves your results. Note that this option will have no effect if you select Absolute Colorimetric Rendering Intent.
|
|
9.
|
Use the check box, if present, to indicate whether to Assign output profile to the PDF queue. This ensures that the selected ICC profile will be loaded into the PDF file and used as the Output Condition, normally a PDF/X feature (part of Output Intents), but it also works for any of the Xinet PDF-writing print queues.
|
|
10.
|
Select the Preferred Rendering Intent for the queue. Profiles are built with a default rendering intent in mind, which is encoded in the profile itself. Choosing the (Profile’s Default) option in the pop-up list uses that Rendering Intent. The output profile, in conjunction with an image’s input profile, may support another Rendering Intent. You can choose one of these from the list below. If the selected preference is not supported by the two profiles, the output profile default will be used.
|
• Perceptual
This Rendering Intent, sometimes also called “Photographic,” squeezes all the source colors so that they fit inside the destination gamut. It’s good for photographs, because, if necessary, hues may shift in order to preserve color-tone relationships. The result is to maintain image detail with some possible subtle color shifts. This is the most commonly used intent.
• Relative Colorimetric
This Intent tries to reproduce color within the gamut of both input and output device as exactly as possible. If a color falls outside the gamut of the destination, the substitute color will have the same hue, but if necessary, different lightness and saturation. This is useful for trying to maintain careful control over important colors, such as you might find in a corporate logo where consistency is important. When using this intent with photos, you might lose detail in portions of the image that lie outside the gamut because two different source colors could end up being mapped to the same destination color.
• Saturation
This Intent reproduces fully saturated source colors as fully saturated destination colors. It’s good for business and presentations graphics such as pie and bar charts.
• Set per colorspace Allows you to establish various combinations of
Intents, depending on the images’ colorspaces, for example, greyscale images may use one intent while RGB images another.
If you are unfamiliar with image replacement technology, Background provides a brief history and explains some of the terminology commonly used when discussing it.
The Image Replacement options for the queue disclosure triangle opens a display that shows queue-based options of image replacement, including parameters such as resolution, format, etc. You may also establish override criteria for these options for any spooler or hot folder that it feeds. There is an additional disclosure triangle,
Advanced (or obscure Image Replacement options) (see Advanced (or obscure) Image Replacement options) for the few sites that need further refinement of these replacement options.
|
•
|
Completely skip the Image Replacement phase of job processing [Not available on PDF-IR queues] This option establishes that low-resolution images placed in layout files won’t be replaced. It also ensures that none of the other transformations that take place upon image replacement, such as source cropping, color correction, color-space conversion, etc. (This is typically used only for testing or very rough proofing.)
|
Don’t replace images
Image resolution will not be changed; however, other transformations that have been configured to take place on the queue during image substitution will still be applied.
Scale (down only) to resolution entered below
This allows you to establish a value for the resolution of the substituted images. (Clicking on the buttons to the right of the type-in box allows you to switch units between
DPI and
DPCM.) This scaling option will greatly improve output times with no visible loss of information when sending to proofing devices.
There are, however, several instances when this setting will be ignored and the full, high-resolution image will be substituted:
Scale (up or down) to resolution below
When images have a higher resolution than the output device, the server will scale them down to the resolution you indicate; when they have lower resolutions, the server will scale them up to the indicated resolution. Notes b) and c) from above apply here too.
Keep in mind that expansion will only provide a softer, less-pixelated rendering, not a sharp blow-up.
|
•
|
Desired Image Resolution
This type in box and the associated unit buttons next to it allow you to specify image substitution resolution that will be used based on the options above.
|
|
•
|
Replacement sharpening options
This pop-up list allows you to automatically apply “unsharp masking” algorithms to images. It is particularly useful in situations where images are being scaled. You may choose between three options:
|
Basic Sharpening when scaling
It is also possible to customize sharpening with your own sharpening parameters. The files /usr/adm/appletalk/usm/basic (Unix systems) and C:\Program Files\Xinet\FullPress\Admin\usm\basic (Windows systems) contain details.
|
•
|
JPEG image compression
[Not available on PDF-IR queues (It’s set, with different options, under Options for controlling PDF creation.)]
|
Disabled
This option establishes that replaced images not be compressed. They will be 8-bit binary encoded. It is the default for most printers.
|
•
|
Delete OPI comments after successful replacement.
With this option off, OPI comments are preserved in the output PostScript. This allows for future replacement at a different resolution. Turning on this option prevents any future replacement, and may be useful for some RIPs or imposition software that try to interpret the comments.
|
|
•
|
Always convert RGB and Lab images to CMYK (even without ICC profiles)
If you have input and output ICC profiles for an image, Xinet will ignore this option and use its ICC color-correction engine to convert the image. If, however, you’re sending a print job for which color profiles are missing, and you’ve enabled this option, the software will always convert images to CMYK. The software ships with built-in conversion tables. If you would like to build customized tables for your site, refer to Xinet Technote 105, available at www.northplains.com/xinet.
|
|
•
|
Preserve extra pixels when source-cropping images.
This option exists for instances where the RIP allows you to reposition images after image replacement has taken place. If images were source-cropped to their exact sizes, moving them would leave gaps at the edges.
|
|
•
|
Image replacement restrictions (Asset Timer)
This option works in conjunction with three Xinet built-in Asset Timer Data Fields: usage_end_date, usage_locked, and usage_start_date1. The Database, Data Fields, Edit Fields page allows you to configure these fields in the manner that they best fit the needs of your site. You will need to assign their use through a Template to at least one “Asset Timer Administrator” who can enter appropriate restrictions for assets. When they are in use and values have been assigned for assets, you may choose to have a queue that encounters these assets take any of the following actions: None (Ignore Asset Timer settings) Watermark expired assets (See page 250 and page 250 for more information about the watermarks) Fail jobs using expired assets
|
For the links to work properly, the administrator must also make sure that the URL path prefix is appropriate. The default value, http://hostname/webnative/imageinfo? where
hostname is the name of the Xinet server, will work for many sites. Some sites, however, might want to change the prefix; for example, if a site were using a Xinet Portal server as an interface to the Xinet server, the prefix would need to point to the Xinet Portal server, as follows:
http://portalservername/PORTAL/IMAGEINFO.php?ipdf= where
portalservername is the domain name or IP address of your Xinet Portal server.
http://portalservername/PORTAL/BROWSE.php?path=/space/DEMO&server=MjEyLjE4NS42Ni4zNQ==&siteurl=L2FsaG91c2U=&win=1033:879
Now, as a result, when you create an Interactive PDF, the images will be linked not only to the correct Xinet Portal server (from the server variable), but also the correct Xinet Portal site. Note, however: if a user has already logged into a different Xinet Portal site, the image will be called up from the logged-in site, not the site specified in the URL.
When you first establish a print queue, Override Image Replacement options will not be present. They appear, however, once you add spoolers or hot folders that point to a print queue for output. The GUI provides one set of override options for each spooler or hot folder directed at the queue.
The override options, which duplicate those found under the Image Replacement options for the Queue, add another layer of administrative flexibility, and will take precedence over the original replacement options set for the queue. For details about each option, please see the previous section.
|
•
|
When using File IDs to locate images, require the file name to match OPI comments
This option limits the use of File IDs during image substitution. The file’s location in the file system may have changed, but its name must remain exactly the same. This option is independent of Do not use File IDs to locate images for replacement. However, when Do not use File IDs to locate images for replacement has been engaged, this option becomes irrelevant.
|
|
•
|
Threshold difference over which images will be scaled (in percent)
Normally, image replacement won’t scale an image when the source and target resolution differ by a very small amount because scaling images by a very small amount can make them fuzzy and introduce other artifacts. Still, because some preflighting software is very particular about resolution, it might be appropriate to scale images when it is in use. This option allows you to establish a threshold for scaling, with the default setting being 5%. (This setting, for example, would not scale down a 304.8 DPI image (120 dots per cm) to 300 DPI.) The larger the percentage, the greater the discrepancy between actual file size and the “scale to” file size must be before the image will be scaled.
|
To set image replacement debugging options, click on the Image Replacement Debugging disclosure triangle. When enabled, the options described in this section provide specific information in the log file. You can view individual log files by selecting the appropriate queue and job through the
Print/HotFolder, Queue Status, Completed Job Logs page.A sample Print Queue log file
The options which appear in the Custom processing options disclosure triangle depend on the type of queue in question. Some types of queues (for example,
File queues) will contain a subset of what appears in other queues, say,
Custom queues.
|
•
|
Send PostScript into above command using Standard Input
Turning on this option means that the server will pass the processed PostScript through a pipe directly to the program without first writing the data to a file on disk. When you use this option the data will disappear unless you specifically save the information with other Xinet options.
|
|
•
|
Put command in the background (not recommended)
Turning on this option allows the server’s lp(1) or lpr(1) system to process more than one print request for the queue at a time. If this were a preview queue, then users could see more than a single job at a time on the screen. Of course, if too many jobs were to run in the background simultaneously, server performance would suffer. Normally, Xinet does not recommend that you use this option. You should only use it for Preview queues.
|
|
•
|
X-DISPLAY environment for print job environment
This option, only used for screen previews, sets the monitor where the program will display the preview. It uses the X Window System, and assumes that unix:0 is the server’s primary display.
|
None Only printer failure messages will go to the log file.
Enable trace of job processing
Messages tracing the network packets required to communicate with the printer will go to the log file. You will only want to use this option when you are debugging a printer.
More verbose debugging
Detailed messages about all printer communications will go to the log file. You will only want to use this option when you are debugging a printer.
|
•
|
Use the Destination/Working folder pop-up list and type in box to select an output directory. You may navigate backwards by clicking on any link within the established path name and use the (New Folder) option if you need to add a new directory to a location. Clicking the Create Folder button registers your choice.
|
|
•
|
Limit output filenames to DOS (8.3) form
Selecting this option will cause the queue to limit file names so that they follow the DOS convention of a maximal 8 characters before the delimiting period and 3 afterwards. This is useful if you are sending files to a DOS-based RIP.
|
a.
Add decimal numbers as needed to prevent overwrite
This option will insert decimal numbers starting with
001 (and, monotonically increasing) before any suffix that you specify; but only if some version of the “unadorned” filename already exists. For example, if
file.ps already exists, the next version would be named
file001.ps, and then
file002.ps.c.
Always append unique HEX number to filename
This option will insert random Hex-encoded numbers before the suffix for every file. This is useful when the output is copied to another location, and the normal “uniqueness” test would not be sufficient to prevent file overwrites.
Click on the Submit button when you have finished all the changes you want to make. If you click the
Cancel button, all the changes you have just made will be forgotten.
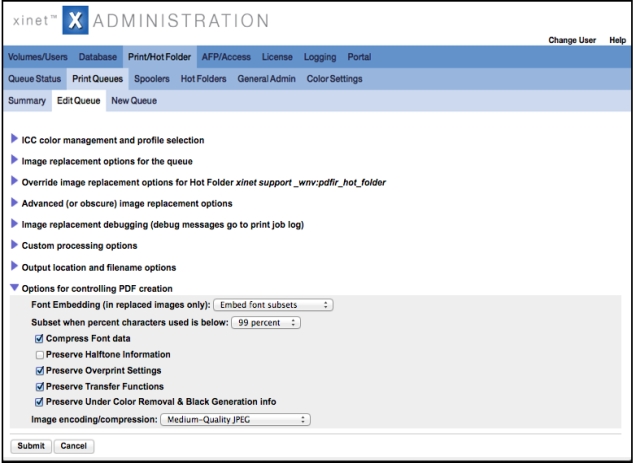
See Adding a PDF File(s) queue if you haven’t already created a configureable PDF queue. The
Options for controlling PDF creation disclosure triangle, towards the bottom of the page, allows further configuration of PDF file queues. The particular options it presents depend on the kind of PDF queue you have established, so you may not see everything discussed in this section for a particular queue.
PDF Image Replacement queues have their own subset of options, which are presented on
Step 7.. Options for PDF-X variants are found in the following topic
Creating/using PDF/X-1a:2001, PDF/X3, PDF/X-4, and Pass4press queues.
|
•
|
Color Model allows you to establish the color space for images. Choices include: Gray (Requires a grayscale PPD)
RGB (Screen Preview)
CMYK (Printable)
CMYK + Spots (Requires Device N OPI support)
|
|
•
|
Color Conversion Strategy determines whether to do anything about graphics that don’t fit the colorspace above. Choices include: Convert to selected Color Model
Do not change source colorspace
|
|
•
|
Native Resolution (independent of images)
By default, Xinet will create PDF files that have a resolution of 576 dpi. You may want to change this to a lower resolution if smaller file size is important. The trade-off may be lower quality; particularly, in gradient blends. If you’re going to send files to a higher-resolution output device, you might want to select one of the higher-resolution options. The trade-off then will be larger-sized files.
|
|
•
|
PDF Compatibility
This option allows you to set the PDF-compatibility level appropriate to the RIP which will be processing your files for print or display. Unless you know you have an older RIP, higher levels will support more options. Please note: If you intend to write XMP data into PDFs so that Xinet can display Producer data, be sure to use PDF version 1.4 or later. Earlier versions do not provide that feature.
|
|
•
|
Compress PDF page data
This option, which works when viewing output with all versions of Acrobat, allows you to compress the size of files. The goal is to do so without too much sacrifice of human readability. If you find you are not able to read information, turn off the option.
|
|
•
|
ASCII-Encode page data
This allows you to set 7-bit rather than 8-bit encoding. It isn’t of particular interest in most workflows today.
|
|
•
|
Font Embedding
You may choose to embed fonts in PDF files or not. If you embed fonts, you can ensure that Acrobat Reader or your RIP will not substitute fonts for those it doesn’t have. Consider also that some RIPs require printer-resident fonts and will reject jobs that have them included; others require all fonts within each job. By making subsets of fonts, you’ll create a custom font for the particular job, which ensures that your fonts and font metrics will be used rather than those with a similar name encountered somewhere in production. Also keep in mind that TrueType fonts can contain a font-designer setting which prevents the font from being embedded in PDF files, no matter what you do here. The pop-up list also offers a Convert Text to Outlines option, which many workflows have employed to get around font licensing issues; however, it makes any postprocess editing quite difficult. The font must be included in the PostScript fed to the queue before Xinet can include it.
|
|
•
|
Subset when percent characters is used is below...
If you include subsets of fonts, you can place constraints upon the conditions under which you include subsets rather than the complete font. The trade-offs are between the potential for future editing vs. file size. Cut-off choices range from 99 percent–30 percent.
|
Subsampled Downsampling
This averages pixel color in a sample area and replaces the entire area with the average color at the specified resolution. (See below.)
Averaged Downsampling
This uses a pixel in the mathematical center of a sample area to replace all of the pixels within that area at the specified resolution. (See below.) Averaged downsampling is less computationally intense; but usually produces less smooth gradients than subsampled downsampling.
Bicubic Downsampling
This uses a weighted average to figure out the color of pixels, producing the smoothest results of the options here, but because it is more precise, takes more time.
ZIP (lossless Flate Compression)
2See Adding printer queues to the server if you haven’t already set up one of these special PDF queues.
The Options for controlling PDF creation disclosure triangle shows features you may adjust for each of these queues. While the options are similar for each type, depending on the variant you have in front of you, you may not see everything listed below.
|
•
|
Make a 2003 version PDF/X-3 (PDF/X-3 option only) If you’ve established a PDF/X-3 queue, Xinet, by default, will use the 2002 standard. You may override that assignment, choosing 2003 instead, if you prefer.
|
|
•
|
Require valid page content boxes
You may indicate whether your workflow requires valid page content boxes. PDF content boxes consist of normally invisible rectangles drawn around the various objects on a page. The boxes tell where objects are located.
|
The Crop box is the invisible box which no graphics may extend beyond. It is not required by the PDF/X-1a:2001 specification.
The Trim box indicates the final page size after printing and trimming.
The Bleed box extends beyond the edges of the trimmed page size so you can be sure that ink extends to the edge of the page after trimming.
|
•
|
Color Conversion Strategy
This option handles elements in the job that aren’t effected through the queue’s image replacement strategy. PDF/X-3 ICC profile supports CMYK and PDF/X-4 ICC profile supports RGB.
|
|
•
|
Font Embedding
You may choose to embed fonts in PDF files or not. If you embed fonts, you can ensure that Acrobat Reader or your RIP will not substitute fonts for those it doesn’t have. Consider also that some RIPs require printer-resident fonts and will reject jobs that have them included; others require all fonts within each job. By making subsets of fonts, you’ll create a custom font for the particular job, which ensures that your fonts and font metrics will be used rather than those with a similar name encountered somewhere in production. Also keep in mind that TrueType fonts can contain a font-designer setting which prevents the font from being embedded in PDF files, no matter what you do here. The pop-up list also offers a Convert Text to Outlines option, which many workflows have employed to get around font licensing issues; however, it makes any postprocess editing quite difficult. The font must be included in the PostScript fed to the queue before Xinet can include it.
|
|
•
|
Input will be trapped
Indicate whether the input for this particular queue will be trapped. Most PDF/X-1:2001 workflows are set up so that the receiving system traps the file during the RIP-process. If the originating document already contains trapping information, however, use this option to mark the PDF/X as pre-trapped.
|
|
•
|
Use the Intended Output Condition pop-up list to select the situation which matches the production conditions that will be used. (PDF/X-3 option only)
|
The PDF/X Output Condition names the printing parameters one anticipates will be used when the job goes to press. For example, the SWOP standard, created by the Committee for Graphic Arts Technologies Standards (CGATS) and commonly used in North America for publications, implies such parameters as a minimum 133 lpi screen, a maximum of 300% ink coverage, colors and dot gain specified, etc.
With PDF/X-1a, Xinet also allows you to choose None; but this clearly violates PDF/X specifications. (This option only exists in this instance because Xinet doesn’t want to preset any of the other options as a default.) Note that while the PDF/X-1a:2001 specification requires an
Intended Output Condition string in the stream, whatever setting you choose here makes no difference in the content of the PDF/X file Xinet produces, other than the string itself. With PDF/X3 queues, however
None is a meaningful and valid choice if an ICC Profile has been assigned to the queue.
The PDF/X standards allow for use of any of the intended printing conditions included in the registry of characterizations maintained by the ICC (www.color.org/drsection1.html). As of this writing, the complete list appears in the GUI. If you have a more proprietary workflow that relies on a different registry, you can customize the available choices.
|
•
|
Crop Box source
Trim Box source
Bleed Box source
Use the three pop-up lists to establish which sources the queue should use for the PDF/X content boxes, for example., the source for Crop Box, Trim Box, and Bleed Box. The following choices exist for all three:
|
None (relies on page layout program)
|
•
|
Continuous tone image scaling
While most placed images should be properly scaled during the Image Replacement phase of job processing, some images may originate with the layout application and be passed through. You can use the options here to scale those images down to save space in the PDF. Be careful not to set this scaling option to a lower resolution than the Image Replacement setting, because that could cause replaced images to be scaled a second time.
|
Subsampled Downsampling
This averages pixel color in a sample area and replaces the entire area with the average color at the specified resolution. (See below.)
Averaged Downsampling
This uses a pixel in the mathematical center of a sample area to replace all of the pixels within that area at the specified resolution. (See below.) Averaged downsampling is less computationally intense; but usually produces less smooth gradients than subsampled downsampling.
Bicubic Downsampling
This uses a weighted average to figure out the color of pixels, producing the smoothest results of the options here, but because it is more precise, takes more time.
Unencoded Binary
Flate (ZIP lossless Compression)
3High-Quality JPEG
Good-Quality JPEG
Medium-Quality JPEG
Note: You will want to check some of the other Queue settings before saving, specifically: the
ICC Profile set for the queue and OPI options. In an ICC workflow, you will need a profile that matches the
Intended Output Condition selected in the
PDF/X-1a options. Most of the image-replacement options are preset to make valid PDF/X-1a (e.g. delete OPI comments, always convert to CMYK), but you may also want to enforce some of the “fail on” options available under the
Image Replacement options for the Queue disclosure triangle.
|
1.
|
Install the XINETPDFX PDD (available from /usr/adm/appletalk/ppds or C:\Program Files\Xinet\FullPress\ppds) in the System folder/Extensions/Printer Descriptions folder (Os 9) or /Library/Printers//PPDs/Contents/Resources/en.lprog folder (OS X). They should select this PPD when setting up a PDF/X1-a:2001 queue.
|
These options only appear with AppleTalk queues. If your printer is connected via AppleTalk, you’ll find an AppleTalk (PAP) Communication options disclosure triangle at the bottom of the Edit Queue page. There, you may change any of the following AppleTalk communication options. In general, if you assigned the correct PPD when you set up the queue, Xinet will have already set these options correctly.
Turning on this option means that psf(1M) will try to query the printer to find out about the printer’s state. The option should be turned off for devices that do not answer queries or do not support bidirectional communications.
This removes exitserver commands from the PostScript stream. Doing so allows spooling to very old Level 1 devices that do not support
exitserver commands.
Turning on this option causes psf(1M) to hold the connection open at the end of the job until the printer has finished processing the PostScript. This allows more reliable reporting of PostScript errors, and is necessary for accurate page accounting. This option exists for a few buggy printers which do not ever “hang up” when Xinet keeps the connection open waiting for results.
This changes the “type” of an AppleTalk printer from “LaserWriter” to “hostname LaserWriter” so that standard PAP clients (like the Os 9 printer drivers) will no longer see the printer.
|
•
|
Debug level
Allows you to determine how much information will be written to the log file. Options include Errors only, Trace the Connection, and Verbose debug of each job.
|
Use the Submit button to lock-in configuration choices you’ve made.
Use the Cancel button to leave settings as they were previously.
If you want to add the same bit of PostScript to every print job that goes to a particular printer, you can create a file called OPTIONS.PS in the spool directory for a given print queue. The spool directory path names is shown at the top of the
Edit Queue page, labeled
Spooling/
Admin Directory (or, if you’re looking at the
/etc/printcap file, it’s the
sd entry). The PostScript slug is inserted after the print job’s PostScript header.
In addition to a single OPTIONS.PS file, you can also create
OPTIONS.spoolername files in the spool directory. If a print job comes in through a spooler with Object name
spoolername, it will first have the
OPTIONS.PS file inserted (if it exists), followed by the
OPTIONS.spoolername file that matches the input spooler. If your spooler name includes 8-bit characters, or characters not allowed in Unix pathnames (like ‘/’), the
OPTIONS.* filename must be converted to the
:XX notation, a la AppleShare (and, don't forget about quoting spaces to the shell).
Turning on debugging under the Custom processing options disclosure triangle will put messages into the print queue’s log file about PostScript slugs that are being searched for and found.