Administration Guide : Working with Videos : Installing the Xinet Video Module

Installing the Xinet Video Module
Note: Starting with Xinet 18.1, Xinet is sold as a full-featured single application. The “Xinet Video module” is now part of the base package of the product.
Read the following subsections for an overview of the installation process before you proceed.
Video server requirements
If local Flash content attempts to communicate with an Internet-enabled location, explicit permission to allow communication with this resource must be granted. If not configured to do so, Flash content may not be captured correctly. On OS X, for example, a warning similar to one shown below will be displayed.
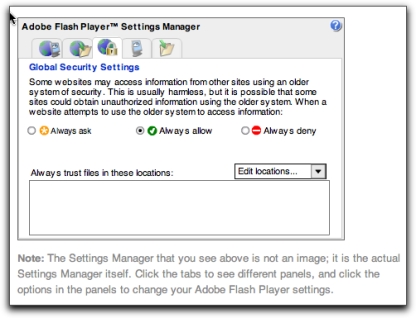
To avoid this, before using the Video module, you should alter the Flash Global Security Settings, available through:
http://www.macromedia.com/support/documentation/en/flashplayer/help/settings_manager04.html#117502
While Always allow is the most convenient option, if you need to be more conscious of security, you can enter individual trusted locations using the Edit locations pop-up.
Linux and Altix systems must include Xvfb(1), xwd(1) and Firefox 3.6 or later.
About Xinet product licensing
The Xinet products, additional subadministrator licenses, Portal, and the Video for Xinet, all share a single license string. If you are licensing all the products at the same time, the license string you receive from Xinet will activate all software packages on your server. If you are adding any products, you will need a new license string which will enable the new functionality of your software packages. You may e-mail Xinet for a new license string at the address below or send a license request through the Xinet Administration GUI. In the GUI, enter the new license string in the Install New License dialog box, then click the Submit button. On OS X and Altix servers, after entering the new license string for a Xinet product, you do not have to restart Xinet unless you are licensing more concurrent AFP users. On Windows and Linux servers, restarting is required new licensing information.
If you’re using e-mail to contact North Plains Systems for a license string, use the following address:
operations@northplains.com
Be sure to include your full contact information, the 5-digit serial number which has been issued for your Xinet server, and for OS X and Altix servers, the 8-character Xinet Hardware ID which is being reported in Xinet License page in the GUI.
Note to those installing Xinet products for the first time:
You will have already licensed Xinet any subadministration upgrades, Portal and the Video module during Xinet installation. If you are installing Xinet products on your server for the first time, you’ll install the Video module with Xinet.
Note to those adding the Xinet database or other upgrades to a pre-existing Xinet installation:
If you are upgrading Xinet software, follow the licensing procedure described above before going through the installation process. During installation, upgrades will install cleanly on top of your current software.
Installation
Overview for first-time installations of Xinet products
1.
2.
3.
4.
5.
Overview for servers already running Xinet software
If you are upgrading a server that is already running Xinet software, follow the appropriate steps below for your configuration. There may be instances when Video for Xinet follows a different release cycle than Xinet as a whole. In those instances, you will install it separately.
1.
2.
3.
Video for Xinet installation procedure
Refer to the subsection that is appropriate for the platform for notes about installing Xinet software.
If you are upgrading from 3.0, you must update previews by hand. The easiest way is to engage options found on the Volumes/Users, System Volumes, Update Previews page of the nativeadmin GUI. If you are upgrading from version 4.0, the installer will synchronize HTML and SWF files on all volumes, adding locally-linked resources in them to the spreadlink table in the database. Previews will only be generated for HTML and SWF files that do not already have them. While this may take some time, it is important that you let this process run to completion, since it may affect how existing HTML and SWF files will be reprocessed in the future.
OS X
1.
In a browser, open www.northplains.com/xinet and log in to AXI Support.
2.
Click Download > Released Software > Video Module.
3.
4.
Either double-click on the file, or in a terminal window, as root, use the command line to untar the file and install it. If you use a terminal window, the correct syntax is:
# tar xvf filename
# ./xvm.install
5.
Installing Video for Xinet...
Synchronizing previews for videos: /Volumes/external/FPAssets15
Video for Xinet installed successfully.
6.
When capturing HTML pages and Shockwave SWF files, the Video module requires that your OS X server launch a WebKit-windowed process. This, because of OS X security, requires that a user has to be logged in to the system. Therefore, you might want to set Security Preferences on your server to enable automatic login and then use the Energy Saver Preferences to put the display(s) to sleep in the shortest period of time possible.
Note: Failure to log in to the server will prevent previews from being generated for HTML pages and Shockwave Flash files.
In addition, if the HTML page or Shockwave Flash file produces any sound, it will be audible through the computer’s speakers if the server sound has not been turned down or muted.
Windows
1.
In a browser, open www.northplains.com/xinet and log in to AXI Support.
2.
Click Download > Released Software > Video Module.
3.
4.
Double click on XVM.WIN.version.exe.
5.
Installing Video for Xinet...
Synchronizing preview for videos: c:/FPAssets15
Video for Xinet installed successfully.
6.
Also ensure that Flash has been installed for Internet Explorer and operating correctly. This is required before the Video module can successfully present previews of HTML pages and Shockwave Flash files.
Keep in mind that when logged in, sounds from HTML pages and SWF files being processed will be audible so you may want to mute the speakers on your system.
Linux and Altix
1.
In a browser, open www.northplains.com/xinet and log in to AXI Support.
2.
Click Download > Released Software > Video Module.
3.
4.
Use a terminal window to untar the file, using the following syntax:
# tar xvf XVM.platform.version.tar
This produces a file in the current directory named installer.
5.
# ./installer
You should receive confirmation that the installation proceeded successfully:
Installing Video for Xinet ..
Synchronizing previews for videos
Video for Xinet installed successfully.
6.
7.
The Video module anticipates that Firefox 3.6 or later will be installed in the /usr/bin directory. If this isn’t its location on your system, change the <firefoxCommand> setting as described in the vsp.conf(4) man page in Appendix A.
If you have an earlier version of Firefox installed, remove it from you system.