Administration Guide : Configuring a User’s Styles : Setting up user environments with existing styles

Setting up user environments with existing styles
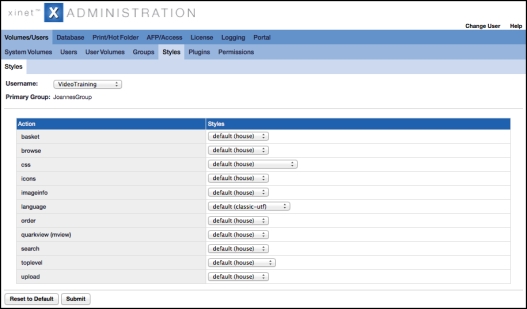
Xinet ships with a few styles already defined for each Xinet end-user action. By default, all styles will have the house style. Many actions also present alternative classic, simple and list styles which offer more stream-lined interactions. The following table contains short descriptions of existing styles. Followed by a table containing a list of actions to which these styles apply. It also lists which styles pertain to which actions.
 
Similar to classic, but provides a button which, at the Toplevel, allows the users to re-login under a different Username. Be sure that the user also has privileges to change his or her password. (You’ll find the User Can Change Password option under the Volume/Users, Users/Edit Users tab.)
Note: Access Control List name (ACLs): Due to a limitation of the use of ACL's with Portal, in addition to designating specific server access, the address of the Portal server must be included for Change Password and Collection downloads to function properly for Portal users.
If the User can change password option to true in the Volumes/Users > Users > Edit User tab, then set the Access Control List Name and IP Host (name or N.N.N.N) in the AFP/Access > Access Restriction (ACLs) > Edit ACL tab. Each IP Host added will display in the Access Granted List.
Provides a House-style icon at Toplevel that allows users to re-login under a different Username, regardless of whether the user has password-changing privileges.
This style combines the applet and e-mail styles. Files will be sent using an Applet, and e-mail will be sent for each file uploaded.
 
You will use the Style Configuration interface to choose among existing styles. If you have created your own styles, they will also appear in the pop-up lists. For more information about creating your own styles, refer to “Xinet customization possibilities” inside the Xinet Guide to Development APIs.
To set up an end-user’s environment:
1.
Click Volumes/Users > Styles and select the user’s name from the Username pop-up list at the top of the page. This list contains the existing Xinet accounts on the server.
2.
Using the pop-up menus below, establish a style for each action that the user will see. You do not need to change the style from its initial default setting if you want the user to see the default style.
The following table lists the actions that ship with Xinet:
 
Determines the look and feel of the xinet ADMINISTRATION view. This action only appears when Username points to Default or nativeadmin.
house (CSS properties for the house style)
house_nihongo (same as above, only with Japanese fonts)
house_simplified_chinese (with simplified Chinese fonts)
classic (empty style for backward compatibility)
In the Volumes/Users > Styles tab, select a user from the Username drop down menu and select a language from the drop down Language menu.
Keep Uploader in mind, however, as an alternative to using the upload action. Uploaders provide an efficient means for transmitting files, as well as other benefits. Refer to Uploader Manager for an introduction to Uploader.
The upload action style here has little to do with Uploader, aside from some shared scripts once uploading
is complete.
3.
You are not necessarily limited to the styles that ship with Xinet. For more information about creating your own styles, refer to “Customizing Xinet Styles” inside the Xinet Guide to Development APIs.