The procedure you follow to add a printer queue depends on the kind of queue you are adding. To see the possibilities, click on the New Queue subtab and then the
Select type of Print Queue pop-up menu. The actual possibilities depend on your system configuration. They most probably include:
|
•
|
AppleTalk, a printer on the network which understands AppleTalk network protocols (PAP)
|
|
•
|
The Bonjour MDNSD printer discovery protocol
|
|
•
|
Custom, a special queue in which you intend to process the PostScript (For example, you may want to send the output through a trapping program or to a remote machine for other processing.)
|
|
•
|
Hold, a pseudo-printer which lets you set up queues where print jobs will be held, either before or after printing. You may want to use hold queues 1) before printing as part of a print-traffic control system, or 2) after printing so that successful jobs may be reprinted without re-queuing and failed jobs reviewed for errors.
|
|
•
|
PDF File, a queue allows users to create PDF files directly through the Xinet server software, The GUI offers several preset options and also allows you to configure output to you particular PDF needs.
|
|
•
|
PostScript File, a printer which lets you write a PostScript file to a directory
|
|
•
|
Remote BSD/LPR, a printer which communicates through the Unix remote printing facility.
|
|
•
|
Scitex Brisque, a spooler, which allows you to set up queues that send PostScript over the network to the Brisque.
|
|
•
|
TCP/IP, a printer on the network which supports bidirectional TCP/IP communication
|
|
•
|
TIFF Files, a queue which will produce rasterized TIFF output. (If a job has more than 1 page, each page will appear as a separate TIFF file.)
|
Additional printer types and queues:
1
|
•
|
[Windows only] Windows Named Pipe queues allow you to access queues on remote systems. Some RIPs use them as input queues.
|
|
•
|
Adobe PDF Distiller queue, which, if you have an Adobe PDF distiller installed on your server, will allow you to create PDF files.
|
|
•
|
DALiM Twist & Swing, a spooler, which, if you have Twist installed, will send the PostScript directly to it.
|
|
•
|
Fusion, a spooler, which, if you have a Fusion RIP installed, will send the PostScript directly to it.
|
|
•
|
Morisawa, a spooler, which, if you have a Morisawa RIP installed, will send the PostScript directly to it.
|
|
•
|
Other queues, which any enterprising administrators may add to the list of available printer types via the Xinet GUI.
|
|
•
|
Screen Preview, a printer which writes the job to a file and then sends the output on to a preview program, provided you have a standard preview program that Xinet recognizes on your server. You may set up the queue to either save the jobs for future printing or delete them after preview.
|
|
2.
|
Select a Print Queue type from the pop up list. 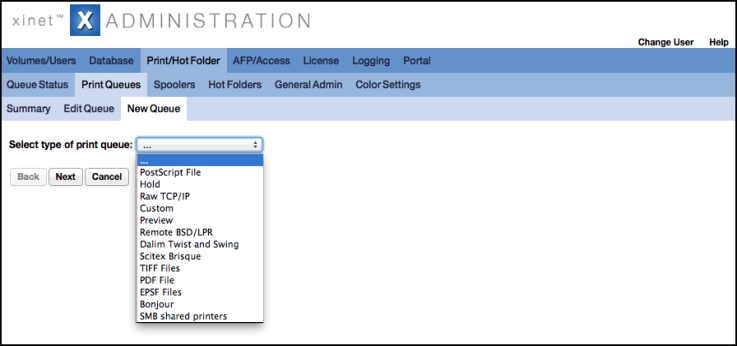
|
|
2.
|
Select AppleTalk as the printer type. Xinet will query the server for information about what AppleTalk zones exist and display the results in the AppleTalk Zones list. If only one zone exits, skip Step 4.
|
|
3.
|
Choose an AppleTalk Zone from the list. A list of available printers will appear.
|
|
4.
|
Select a printer from the Select Printer (or subtype) pop-up. Note that other spoolers may appear in the list (Each will have the word Spooler as part of its name.) Under most circumstances, you will not want to spool to another spooler.
|
|
5.
|
Establish a name for the queue in the Unique print queue name box. There may already be a name there. Feel free to change it. What you leave in the box is the name which will appear in the Xinet administrative GUI for the queue, not the name which will appear when clients are choosing a print queue. (You’ll name that later.) It is also the name you’ll use if you use lp(1) or lpr(1) to send a file to the queue.
|
|
6.
|
Click on the Create new Queue button. Once the queue has been established, the GUI will open the Edit Queue page for that print queue. Xinet makes some assumptions about how to configure queues. You may change these default settings if you would like. If you want to know more about configuration options, turn to Configuring printer queues (more about the Edit Queue subtab).
|
Prerequisite: A printer must be able to accept data via
lpr(1). Otherwise, this method of communication will not work.
|
2.
|
Select Bonjour as the printer type from the pop-up list. The GUI will display a new pop-up list that list all printers that broadcast themselves on the network via Bonjour. Select a printer from the Available Channels list.
|
|
3.
|
Select a printer from the Select Printer (or subtype) pop-up list.Note that other spoolers may appear in the list (Each will have the word Spooler as part of its name.) Under most circumstances, you will not want to spool to another spooler.
|
|
4.
|
Provide a new name in the Unique print queue name box if you don’t like the one that appears there by default. This is the name that will appear in the Xinet GUI for the queue, not the name which will appear when clients are choosing a print queue. (You’ll name that later.)
|
|
5.
|
Click on the Create new queue button. Once the queue has been established, the GUI will open the Edit Queue page for that print queue. Xinet makes some assumptions about how to configure queues. You may change these default settings if you would like. If you want to know more about configuration options, turn to Configuring printer queues (more about the Edit Queue subtab).
|
A PostScript File printer creates a complete PostScript file as its output. This is useful if you want to send files off site, or want to write into an output device’s hot folder. Custom printers can be used when you want to send the output through another program for processing. You follow the same procedure to add these printer queues on the server. The distinction between them comes in the default configurations that Xinet assigns to them and how you further configure them after they have been added.
|
2.
|
Choose PostScript File or Custom printer type in the Select type of Print Queue pop-up menu, and then click Next.
|
|
3.
|
Choose an output folder from the Select an Output folder pop-up list, using it iteratively to navigate the file system. (You can also click on any path segment to return to a previous level of the structure.) If you’re printing the job to a file (for example., writing the job to disk), the folder you select should be the directory where you want the file to be saved.
|
|
4.
|
[optional] If you want to write files to an existing directory, you are almost done. If, however, you want to create a new directory, select the (New Folder) option and type the new folder’s name in the box that appears. Click the Create Folder button to register your choice, then Next.
|
|
5.
|
Establish a name for the queue in the Unique print queue name box. There may already be a name there. Feel free to change it. What you leave in the box is the name which will appear in the Xinet administrative GUI for the queue, not the name which will appear when clients are choosing a print queue. (You’ll name that later.) It is also the name you’ll use if you use lp(1) or lpr(1) to send a file to the queue.
|
|
2.
|
Select Preview in the Select type of Print Queue pop-up list.
|
|
3.
|
Click on the Create new Queue button. If you are setting up a preview queue, the queue will be automatically configured to use the preview software you selected and to display the output on the server’s monitor. You can, however, change many configuration options in the Edit Queue page, which will be displayed immediately. Configuring printer queues (more about the Edit Queue subtab) provides details. If you are setting up a custom queue, Xinet will automatically configure the queue to direct requests to your output device.
|
|
1.
|
Choose Windows Printers in the Select type of Print Queue pop-up menu and then click Next.
|
|
3.
|
[optional] Use the Select an output folder pop-up list if prompted. Selecting the folder will be an iterative process. If necessary, type in the name of a new folder once you navigate to the correct level of the file system. You can use path segments in the displayed path to navigate backwards if you’d like. When you’ve identified the appropriate folder, click the Create Folder button, then Next.
|
|
4.
|
Supply a Unique print queue name in the type-in box if you do not like the one that appears by default.
|
|
2.
|
Select Hold in the Select type of Print Queue pop-up list.
|
|
3.
|
Set a hold time for the job. If you type in 0, files will be held indefinitely. With such a setting, unless you monitor your file system and delete files periodically, you may end up using large amounts of disk space on the server.
|
|
1.
|
Select Named Pipe in the Select type of Print Queue pop-up list, then click the Next button.
|
|
2.
|
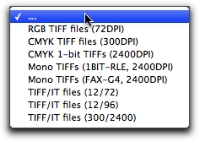
Select TIFF Files as the printer type in the Select type of Print Queue pop-up list
|
The section on “TIFFIT Parameters” in Xinet TechNote 122 provides more information about the three TIFF/IT options listed above.
|
4.
|
Select an output folder using the Select an Output folder pop-up list iteratively. Use the Create Folder type in box and then click the Create Folder button if you would like to add a new folder. If you need to navigate the file system backwards, click on segments of the path as short cuts to directories in the structure. Click the Next button when you’re satisfied with the destination folder.
|
A PDF Files queue allows users to create PDF files directly through the Xinet server software, for example., users do not need a client-based distiller, nor do system administrators need to configure third-part distillers on the server. The GUI offers several preset options and also allows you to configure output to you particular PDF needs.
Xinet also supports spoolers which perform OPI-like image
replacement directly on
PDF files without conversion to PostScript. This is particularly useful for sites that receive files using newer transparency features. If you are interested in more information, be sure to first read about
Setting up configureable PDF queues and then
PDF Image Replacement workflows.
Any RIP can be given parameters that will determine what is included in a PDF created from PostScript. Acrobat Distiller, for example, reads parameters from a job.options file when making PDFs; Xinet uses an
OPTIONS.PS file. Theoretically, those parameters should be enough to create PDFs that never include features unwanted in the prepress workflow.
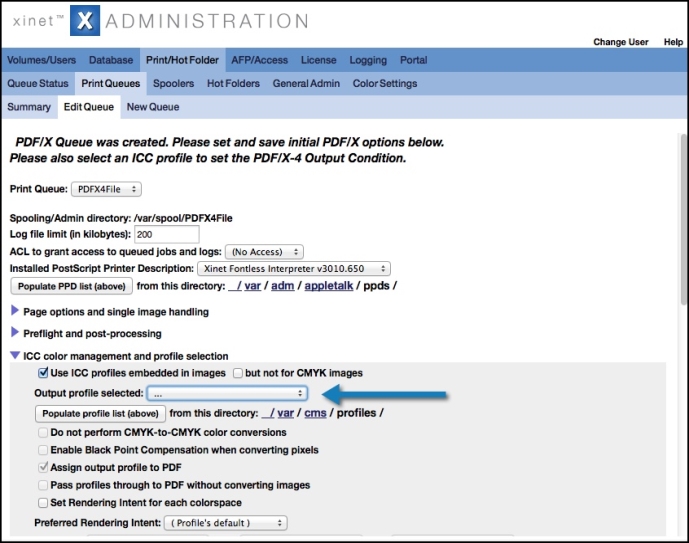
The only substantial difference between Xinet PDF/X-1a and PDF/X-3 queues is the addition of support for a color-managed workflow. After creating a PDF/X-3 queue, you need to configure it before the queue will make valid PDF/X-3 files. As an absolute minimum, you can assign an CMYK Output ICC profile to the queue. Note that you may be presented with both RGB and CMYK profiles, since this part of the configuration is not PDF/X-3 specific, but that selecting an RGB profile violates the PDF/X-3 standard. The selected profile will be copied into the PDF output, as part of the
Intended Output Condition.
|
2.
|
Select PDF File as the printer type in the Select type of Print Queue pop-up list. Then, click the Next button.
|
• PDF Image Replacement
For use when you want to avoid PostScript during printing or file creation; you’ll configure its options
• PDF/X-4 File
Requires a selection of an ICC profile to set the PDF/X-4 Output conditions. Other options presented are configureable.
Note: The output from a Printable PDF File queue could contain RGB images if the original file contained RGB images—
unless you made sure that all users used FPOs in their files, since then, image replacement could be set up on the queue to always convert RGB and Lab images to CMYK. You could also change the option for failing jobs that contained RGB images. For details about these options turn to
Image Replacement options for the queue.
PDF/X-1a and PDF/X-3 queues will require further configuration. Each PDF/X-3 queue, before it will make valid files,
must be assigned a CMYK ICC profile (described in
ICC color profile selection for printer queues). For both PDF/X-1a and PDF/X-3 queues you may also want to set
Options for controlling file creation using the respective
PDF/X-1a or
PDF/X-3 Edit Queue page.
Creating/using PDF/X-1a:2001, PDF/X3, PDF/X-4, and Pass4press queues also explains more options that you may set for these queues.
If you have Samba or the Xinet PC Connectivity package installed on your server, you can create queues that communicate using smbclient. This is a good way to communicate with output RIPs running on the Windows platform. If Xinet does not find the appropriate software, this option will not be present in the
Select type of Print Queue pop-up list. Xinet will look for
smbclient in the following places:
/usr/bin/, /opt/samba/bin, /usr/samba/bin, /usr/local/bin, and
/usr/local.
|
1.
|
Select SMB shared printers in the Select type of Print Queue list, then click Next.
|
|
2.
|
Provide the NETBIOS server name for the server Xinet will contact to print the job.
|
|
3.
|
Type in the Shared printer name (or IP address), the Shared printer name (the name end users will see and use as they select the queue), and then the Login user name and Password, if they are necessary. Be careful about using appropriate uppercase or lowercase letters in the password. (Some servers insist upon only uppercase letters in passwords. If your connection fails, try using all uppercase letters.)
|
|
2.
|
Select Raw TCP/IP as the printer type in the Select type of Print Queue pop-up list. Then click Next.
|
|
3.
|
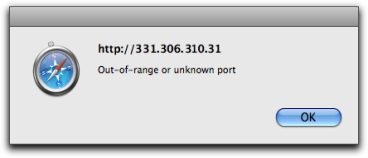
Enter the hostname or IP address for the targeted host. Also type its port number in the type-in box. Most devices, for example, Harlequins, will display the port number in their own GUIs.
|
Click Next to register your entries.
If the port number doesn’t work, you will see a ‘
Unrecognized port number warning’ message.
|
4.
|
Supply a Unique print queue name, then click the Create new Queue button.The Edit Queue page for your newly established queue will appear. Xinet makes some assumptions about how to TCP/IP queues. In this case it will have set up the queue to use ripsock(1) to process jobs. You may change these default settings if you would like. If you want to know more about configuration options, turn to Configuring printer queues (more about the Edit Queue subtab).
|
|
2.
|
Select EPSF Files as the printer type in the Select type of Printer Queue pop-up list. Then click Next.
|
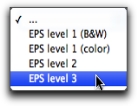
There are four queue choices. What you select depends on what PostScript Language capabilities you need for the output. The main differences between them are the color capabilities they support. Language Level 2 supports the Separation colorspace, and Level 3 supports
DeviceN. If you make Level 3 EPSF files, they may be rejected by a Level 1 or 2 RIP. Note that the interpreter itself will support Language Level 3 in the input PostScript, and the output language level only selects how some graphics may be converted.
EPSF files are created by the Xinet PostScript/PDF Interpreter, via the epswrite output device (documented in
TechNote 122, available at
www.northplains.com/xinet), which means that many higher-level constructs may be interpreted into simpler graphical operations (sometimes to the level of pixels), depending on the Language Level selected. For Example, PDF 1.4 transparency cannot be translated into PostScript, so it will always end up rendered as pixels.
There is no special configuration section for these EPSF queues All of their options are controlled by the call to runrip(1) in the command-line text input box under the
Custom disclosure triangle of the print queue
page (introduced on
page 545 in this chapter).
TechNote 122 provides a complete list of options that affect the
epswrite device.
|
4.
|
Use the Select an Output folder pop-up list iteratively to point to the repository where you want the EPS files to land. Use the (New Folder) option if you need to create one that doesn’t already exist. You can always navigate backwards by clicking on any segment in the displayed path.
|
Click Next when you’re done.
|
2.
|
Select Remote BSD/LPR from the printer type list, then click Next.
|
Click Next when you’re done.
|
5.
|
Click on the Create Queue button. You will return to the Printer Info & Config window, with the queue you just created highlighted. Xinet makes some assumptions about how to configure queues. In this case it will have set up the queue to use print2lpr to process jobs. You may change these default settings if you would like, using the Edit Queue page which opens automatically when you create the queue. If you want to know more about configuration options, turn to Configuring printer queues (more about the Edit Queue subtab).
|
|
2.
|
Select Scitex Brisque from the printer type pop-up list.
|
|
4.
|
Click on the Create new Queue button. The Edit Queue page for your new queue will open automatically.
|
Some additional options may appear in the Select Printer Type pop-up menu. Xinet searches your server for the existence of third-party programs of which it has special knowledge—for example RIPs and PDF distillers—and, if it finds these programs, adds them to the pop-up menu.