Note: To share the newly created Marquee theme with Portal users going forward, you should create and save your new Marquee theme CSS file in the default directory before creating new Portal sites. By doing so, the CSS file is shared with new Portal sites. For more information about how to create a new Portal site, see
Add Sites. If you have
existing Portal sites created already, you must save the new Marquee theme CSS file in each Portal Path specified in the
Site Manager > Site Summary page. For more information, see
Step 5.
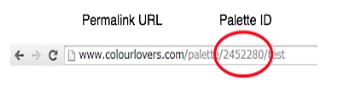
In this example, we will use colourlovers.com/palettes/add to generate a new color palette. Once generated, the color palette ID is pasted in to another 3rd party application, PaintStrap, to create a CSS file.
Tip: The
colorlovers.com site provides the ability to create your own color palette based on colors used in an image, such as your own logo image.
• Step 2: Optional - Edit the color for each element, such as text, background, and so on. By default this theme is shared in the PaintStrap Gallery. You may choose not to share your theme.
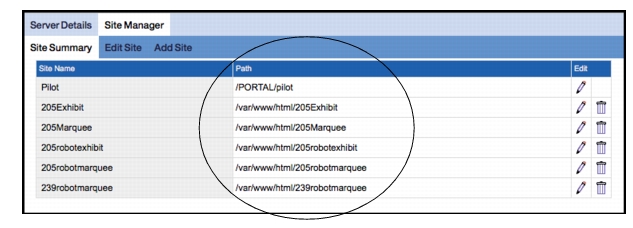
Note: If you want existing Portal sites to use this newly created Marquee theme, log into http:’PortalAddress’/PORTALADMIN, click
Site Manager > Site Summary and make not e of the
Path for the existing sites you want to grant access to the newly created Marquee theme. Locate the Path directory and open the
templates/css directory
. Place the CSS file in that directory.
Using an example in the image below, open the
/var/www.html/205Marquee directory and then
templates/css. Place the new template in this directory.
Request your Portal users to log out and log in again to gain access to the new Marquee template.