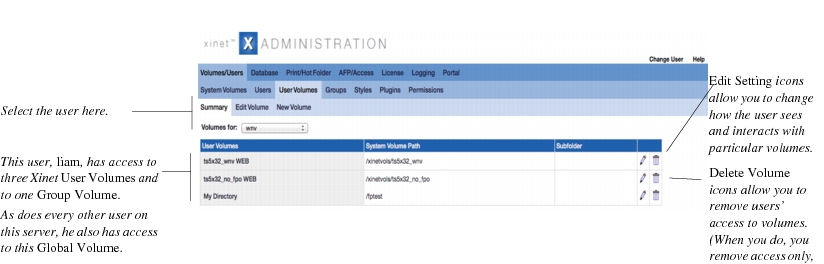
To review volume access settings for a given user, click Volumes/Users > User Volumes > Summary and then select a user from the
Volumes for pop-up list.
|
•
|
User volumes
Web volumes with or without a subdirectory restriction, assigned to a particular user or group on a volume by volume basis. You are likely to allow users varying degrees of access to and give different privileges for individual volumes.
|
|
•
|
Global volumes
Web volumes to which every user automatically has equal access.
|
|
1.
|
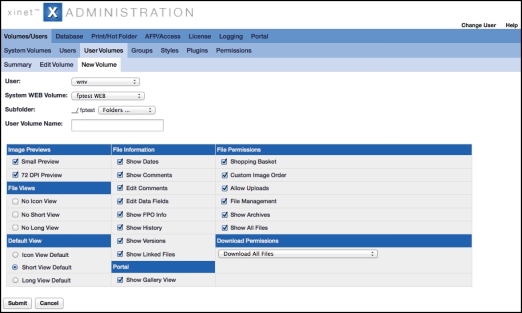
Click on the Volumes/Users Volumes, New Volumes tab, then select the user name in the Volumes for pop-up menu.
|
|
2.
|
Select a System Web Volume from the pop-up list, and optionally, select an existing subfolder and/or create a new one to which you want to restrict this user’s access.
|
Fill-in User and
Volume information using popup lists, check boxes or typing, as described below.Configuring a user’s permissions for Xinet access to a volume
• User: This two-tiered pop-up list allows you to choose the customer or user to whom you will give access to the volume.
• System Web volume: This pop-up list allows you to choose the Web volume to which you’re giving the user access. The pop-up list you see here contains all the volumes on the server upon which Xinet has been enabled. You can constrain access to a given subdirectory if you want. (See
File system organization for Xinet for ideas about organizing your file system.)
System Web Volumes are originally established through the
Volumes/Users, System Volume, New System Volumes page on the server. If you don't find the volume you’re looking for in the pop-up list of
System Web Volumes, you need to return to this
New System Volumes page
and establish a new
System Web Volume there.
• Sub-Folder: This is optional. In some cases you may want to limit a customer’s access to a subdirectory or folder within a volume. You can do so by using the pop-up list. You may go as deep as you want, for example, a subdirectory within a subdirectory and may create new sub-folders at will. The GUI displays the current path beneath the pop-up list. This path is interactive, meaning you can click on any segment within it for faster file system navigation.
• User Volume Name: What you type here establishes the name of the volume or subdirectory that the user will see on the Web when he or she goes to your Web site.
• Small Preview: This determines whether or not users will see small previews of images. Small previews are, at most, 112 pixels in either horizontal or vertical orientation. These are the previews which, by default, users see in Xinet’s
Short View. Without Small Previews, images must be identified by custom-icon previews or possibly 72-dpi previews.
• 72 DPI Preview: This determines whether you allow users to view “large” previews of images. The 72-dpi preview is useful for customers who wish to download Web-ready images for use on their own web sites. You may want to turn this feature off if you wish to charge customers for Web-ready images.
• No icon view: This determines whether or not users, when browsing, can view files in Xinet using the icon format.
Icon View shows files and folders together, with a Macintosh-style icon displayed for each item. For images, a custom icon will be generated from the image data. For non-images, the icon will be the icon of the application that created the document. Clicking on an icon will bring up more information about the file. Clicking on a folder will display the contents of that folder in the browser.
• No short view: This determines whether or not users, when browsing, can view files in Xinet using the
Short View format. In the short view, all subfolders of the current folder will be displayed first, with an icon next to them. Clicking on the folder name will display the contents of that folder in the browser. Following the folder listing is a table of the files in the folder. The file’s name appears first in each table entry. If available, there will be a 112x112 pixel preview. If not, the icon for the application that created the file will be displayed. Below the image, there will be a set of icons representing actions described above. Which icons are displayed will depend on the permissions given to the user who is connected.
• No long view: This determines whether or not users, when browsing, can view files in Xinet using the
Long View format. In the
Long View, the display will start with a listing of folders preceded by the icon. Following that will be a detailed listing of each file, including a 112x112 pixel preview. The contents of the listing are identical to the information presented in the information window, with the exception that you will not be able to change keywords. You may also add items to your Collection when viewing files this way.
• Icon view default: This setting means that the Xinet user will see information in the
Icon View format, by default, when beginning a Xinet session.
• Short view default: This setting means that the Xinet user will see information in the
Short View format, by default, when beginning a Xinet session.
• Long view default: This setting means that the Xinet user will see information in the
Long View format, by default, when beginning a Xinet session.
• Show Dates: This determines whether or not information appears about the time when the image was last accessed, last modified, and created.
• Show Comments: This determines whether or not users will see the
Comments field in image information windows and Xinet’s
Long View mode. All Xinet users will see
Comments, unless you choose to suppress them.
• Edit Comments: This determines whether you will allow Xinet users to add to, or change, the information which appears in the
Comments field of the information window, in
Long View, and in the-I dialog box.
• Edit Data Fields: This determines whether or not users can edit Xinet data fields. When enabled, it overrides a conflicting
Editable setting in the
Permission Set.
• Show FPO Info: By default, each Xinet FPO includes information about itself and its corresponding high-resolution image. You may wish to suppress this information if customers are not interested in FPOs or you do not want to reveal information about the high-resolution images.
• Show History: This option only works in conjunction with the database. Turn on this option if you want a Xinet user to be able to view a detailed history of what has happened to a particular file on the server.
When the option is “on,” a Detailed History button appears in Xinet
Information windows. Clicking that button displays the detailed history of the particular file, including information about the actions performed on it, the dates when they occurred, the users who performed them and the users’ IP addresses.
• Show Versions: This Xinet version management option works in conjunction with the Xinet
makeversion Action described in
makeversion. It allows remote viewers to see the various versions of files in a Web browser, change which of those versions is considered to be the “current” version for production use and download versions.
Be sure that you have also turned on File Management.
Show Versions will not work, otherwise. Also, you must enable the database on the volume for this feature to work with archived versions of files.
• Show Linked Files: The linked files viewer allows Xinet users to find and see previews of all the documents in which a selected image has been used, even when that file has been archived. It provides a visual summary about link information stored in the database. By default, when engaged, it will allow the
mview CGI to display all levels of linked child and parent files, and, optionally, may effect how child locks will be applied when the Xinet Portal
Asset Timer module has been engaged.
The Show Gallery View option allows users to review visual snapshots of assets while browsing through the directory structure in the Portal browser window. This option can be set for individual user volumes or set for all volumes for a selected site.
To enable this option per user volume, click Volumes/Users > User Volumes and
from the
Volumes for drop down menu, select a user. The
Summary page displays a list of volumes available for this user. Select a user volume to apply this option to and enable the check box
Show Gallery View.
To enable this option for all volumes for a particular site, click Portal > Edit > Site Manager and click the edit icon for a Site Name. The Configuration page is displayed. Scroll down to the
Display Options section and enable
Show Gallery view button.
• Collection: This determines whether customers can use the “Collection” feature and its plug-ins for batch downloading and/or conversion of files.
• Custom Image Order: Turning on this feature allows customers to download images scaled to the size/format they need for a particular purpose. The server keeps track of these activities in its Xinet Access Log.
Web Access logs provides information about looking at logs of custom-ordered images.
• Allow Uploads: This determines whether or not a customer can use Xinet to place files on the server. For example, a customer might download FPOs, place them in a InDesign document, and then want to put the document on the server for approval and production. The customer may type in the name of the file or use the
Browse button to point to the file. In many cases, you will want to set up a separate volume for uploads. Please note that this option needs to be
on if you intend to have clients use
Uploader applications to upload files to the volume.
• File Management: This option, when “on,” allows end-users to create folders inside their Xinet volumes, move, rename and delete files and folders.
• Show Archives: This determines whether or not you allow users to see and search for archived files.
• Show All Files: Without this checked, a user will only see image files.
What’s considered an image file? Xinet will consider any file for which it makes FPOs to be an image file. If you turn off FPO generation for any type of file (see
Fine tuning preview generation), Xinet will not consider those files to be images and will not, therefore, show them unless you also engage this option.
• Other high-resolution files not
classified as images include files for which the Xinet server does
not generate FPOs, for example, page layout program files and spread sheets.
– Don’t make FPOs for “Vector” EPS files
– Don’t make FPOs for PDF files
– Don’t make FPOs from TIFF files with spot or mask channels
– Don’t make FPOs from native-JPEG files
– Don’t make FPOs from Raw Camera/GIF/ArtPro CTs
• FPOs includes all files for which FPOs have been generated.
• Download All Files: This option allows the user to download all files on the specified Xinet volume.
• Download All Files Except Hi-Res Images: This will allow the user to download FPOs, layout files and other files for which FPOs aren’t generated. Keep in mind that
Custom Image Order will not work properly without the ability to download high resolution images.
• Download Non-Image Files: This allows users to only download non-image files such as page layout files and spreadsheets.
• Download All Files Except FPOs: This setting allows the user to download high-resolution images but not their corresponding FPOs. The user will also be able to download many other kinds of files, such as InDesign, Excel, etc., for which the Xinet server does not create FPOs.
• Disable downloads: This setting means that the user will not be able to download files of any type from the Xinet server.
|
1.
|
Select the Volumes/Users, User Volumes, Summary tab.
|
|
2.
|
Select the user name in the Volumes for pop-up menu. A list of volumes to which the selected user has previously been given access will appear.
|
|
3.
|
Click the Delete Volume icon associated with the volume.
|
The multi-level linked files option will be engaged, by default, on the Xinet server, which means that any time you engage the Show Linked Files option on a volume, as described on
Giving a user Web access to a volume, the
mview CGI will display all levels of linked child and parent files. When the multi-level linked files option is
off, only a single level of links will be displayed.
The state of multi-level linked files depends on the MultiLevelLinkedFiles setting in the Xinet database. To see the current setting, use the MySQL command: