Administration Guide : Installing Xinet : Setting up a Separate Dedicated DB Server - Optional

Setting up a Separate Dedicated DB Server - Optional
To improve the performance for environments managing a large number of assets, a separate dedicated database server can be set up to manage the Venture database, where low resolution previews of images/videos, annotations, metadata, FileIDs for linking and other information is stored. As an Administrator, install Xinet on your dedicated database server, obtain a separate Venture-only license, and migrate the Venture database from the main Xinet Administration server to your dedicated db server. Instructions are provided below.
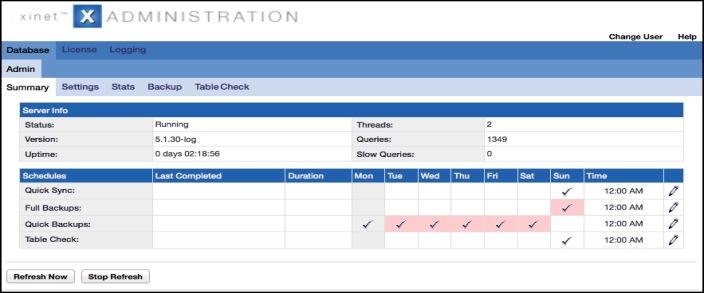
Once Xinet is licensed on your Dedicated DB Server, a limited number of Administration tabs specific to the Venture database are available. For details on the options available in this view, see Xinet Statistics and Database Operations — the Database, Admin subtab.
Note: The database daemon (dblogd(8)) will run on the main Xinet Server, not on the Dedicated DB Server, so the Dedicated DB Server cannot run independently of the Xinet Administration server.
To install and license Xinet on a Dedicated DB Server:
1.
For more information, seeInstall Xinet Server on a Macintosh Server (first time or upgrade).
2.
Launch Xinet on your Dedicated DB Server and click License > License > Send License Request.
3.
Note: Remember to place a check mark in the Database Server only field to indicate a Venture license is required.
For more information, see Licensing Software.
Next, as an Administrator, start the database manager (dbmgr) on your Dedicated DB Server and migrate the Venture database from your main Xinet Administration server.
To migrate the database to your Dedicated DB Server:
1.
dbmgr -mysqldonly <IP address or hostname of the Xinet Administration Server>
2.
Click Database > Admin > Settings and in the Database Server options click Stop Database.
IMPORTANT: If this is a new Xinet installation on both the Xinet server and your dedicated database server, DO NOT STOP the database.
3.
Establish where and when the latest backup is located. On the Xinet Administration view, click Database > Admin > Backup to review the details. Click Full Backup to generate a backup and copy it to your Dedicated DB Server.
Next, configure the main Xinet Administration server to point to the database on your Dedicated DB Server.
To configure the Venture DB location on the main Xinet server:
# /usr/etc/venture/bin/dbmgr -remotemysqld <IP address or host name of the Dedicated DB Server>
Note: For an environment where Xinet has been installed previously, some records may not have been transferred at the time of migration to the Venture database to your Dedicated DB Server. To resolve this issue, run any of the following programs on your Dedicated DB Server:
Run the listdir program to verify if the contents displayed in the Portal browser are up-to-date in the Venture database.
Run the database daemon (dblogd(8)) to stop and restart the database. Once restarted, the database daemon checks for changes and updates the Venture database.
Run the program syncvoltodb with no flags to manually synchronize file information in the Venture database.
For more information, see Database synchronization and Command-line manual pages.
 
Troubleshooting information:
What happens when the webbdlogs is running on the Xinet Administration Server while migrating the Venture database?
The webdblog continues to be processed by the Database Daemon (dblogd(8). Once the dbmgr -remotemysql command is run, the webdblog entries are processed and entered into the database on the Dedicated DB Server instead of the main Xinet Administration Server.
Why isn’t mysqld running on the Xinet Administration Server?
After the Venture database migration is completed, mysgld will only run on the database server.
Open the my.cnf and locate the following code:
Disabling the Dedicated DB Server
You can disable the Dedicated DB Server at any time and migrate the database back to the main Xinet Administration Server.
To disable the dedicated database server:
1.
2.
Click Database > Admin > Settings and in the Database Server options, click Stop Database.
3.
On the Xinet Administration Server, run the following commands from a command-line:
cd /usr/etc/venture/bin/
mv no_safe_mysqld safe_mysqld
ln -s safe_mysqld mysqld_safe
4.
a. On the Xinet Administration Server, in a command-line, change directory to /usr/etc/venture/var/ and open my.cnf
b. Remove the "host" and "protocol" lines from the [client] section.
c. Copy the "socket" line from the [mysqld] section to the [client] section.
d. Save the my.cnf file.
5.
Remove the pointer to the Mysql Host on the Dedicated DB Server.
a. On the Xinet Administration Server, open /var/adm/webnative/dblogd.conf.
Windows: c:/Program Files (x86)/Xinet/WebNative/Admin/dblogd.conf
Unix: /var/adm/webnative/dblogd.conf
b. Remove the Mysql Host line.
c. Save the dblogd.conf file.
6.
a. On the Administration Server, first create a new folder to put the backup database file from your Dedicated DB Server. Click Databases > Admin > Backup and click Edit for the Backup Location. Click Create Folder, specify a new folder name, and click Set Directory.
Note: It is best practice to always create a new folder to store your backup database file.
b. Copy the backup database file created in Step 3. from the Dedicated DB Server to the Xinet Administration Server putting it in the location created in Step a. The backup file uses the following naming convention: wnv_fullbackup.<DATE>.
c. Restore the database on the Xinet Administration Server. With each full backup, Xinet includes a restoration script. In a command-line, on your Xinet Administration Server, run the following:

# RESTORE_FULL
The database will start automatically when this script is run.
For more information, see Backing up and restoring data.
Note: You can create a new database, on the Administration Server, by running the /usr/etc/webnative/configure.apache script which extracts information from your stored assets. Note, this will take some time to complete if you have a large number of assets in your database.